Category Archives: DIY TIPS

what-security-doors-and-windows-protect-from-fire

What security doors and windows protect us from a fire?

In recent years, Greece is experiencing more and more devastating fires, which often leave behind hundreds of victims.

Proper organization by the state of fire protection is of course crucial in this matter, but it makes sense to wonder if we can shield our homes with security doors on our own.

There are many ways of fire protection in a house and one of them concerns the frames and windows.

These openings in the bearing body play a huge role in whether the fire will eventually destroy the house or cause minor damage, but also in whether the occupants will be protected since they have not had time to leave and are still inside.

So let’s see below what applies to the three most popular types of doors and windows, wood, aluminum, and PVC.

The key element that makes the difference is the material of the security door and the window in terms of its ability to stop the course of the fire and not allow it to enter the interior of the house.

Wooden windows and security doors

Wooden windows and security doors offer no fire protection, precisely because wood is a flammable material.

Even with special coatings, it is a matter of time before we talk about a big fire, the window burns and the fire enters the house. The same goes for the old wooden windows and doors, which do not have good tightness.

If the fire enters the house, then it is especially dangerous for the occupants even from the first minute due to the smoke and fumes.

In addition, the fire immediately causes cracks in the walls, resulting in a problem later in the statics of the building.

PVC windows and doors

The same problem of tightness is observed in the plastic windows and PVC doors, so also the fire penetrates with great speed inside.

An even more important problem, however, is that the plastic, when burned, produces extremely toxic fumes, which lead to immediate death by inhalation.

After all, inhaling toxic fumes is a more common cause of death in the event of a fire than burns.

Aluminum windows and doors

Aluminum windows and doors have the incomparable advantage of high tightness, so in the first phase, as long as the shutters and windows are closed, they do not allow fire to enter.

So, there are many examples of people who were inside their house and the fire went over the house, but without destroying it or creating toxic smoke.

In addition, aluminum is a non-flammable material and has high resistance to high temperatures, so it can withstand a long time under the influence of fire.

Therefore, it can adequately protect both human lives and our property.

Read more about security doors:

How to Make the Fluffiest Fabric Stuffed Pumpkins! | Thrifty Decor Chick


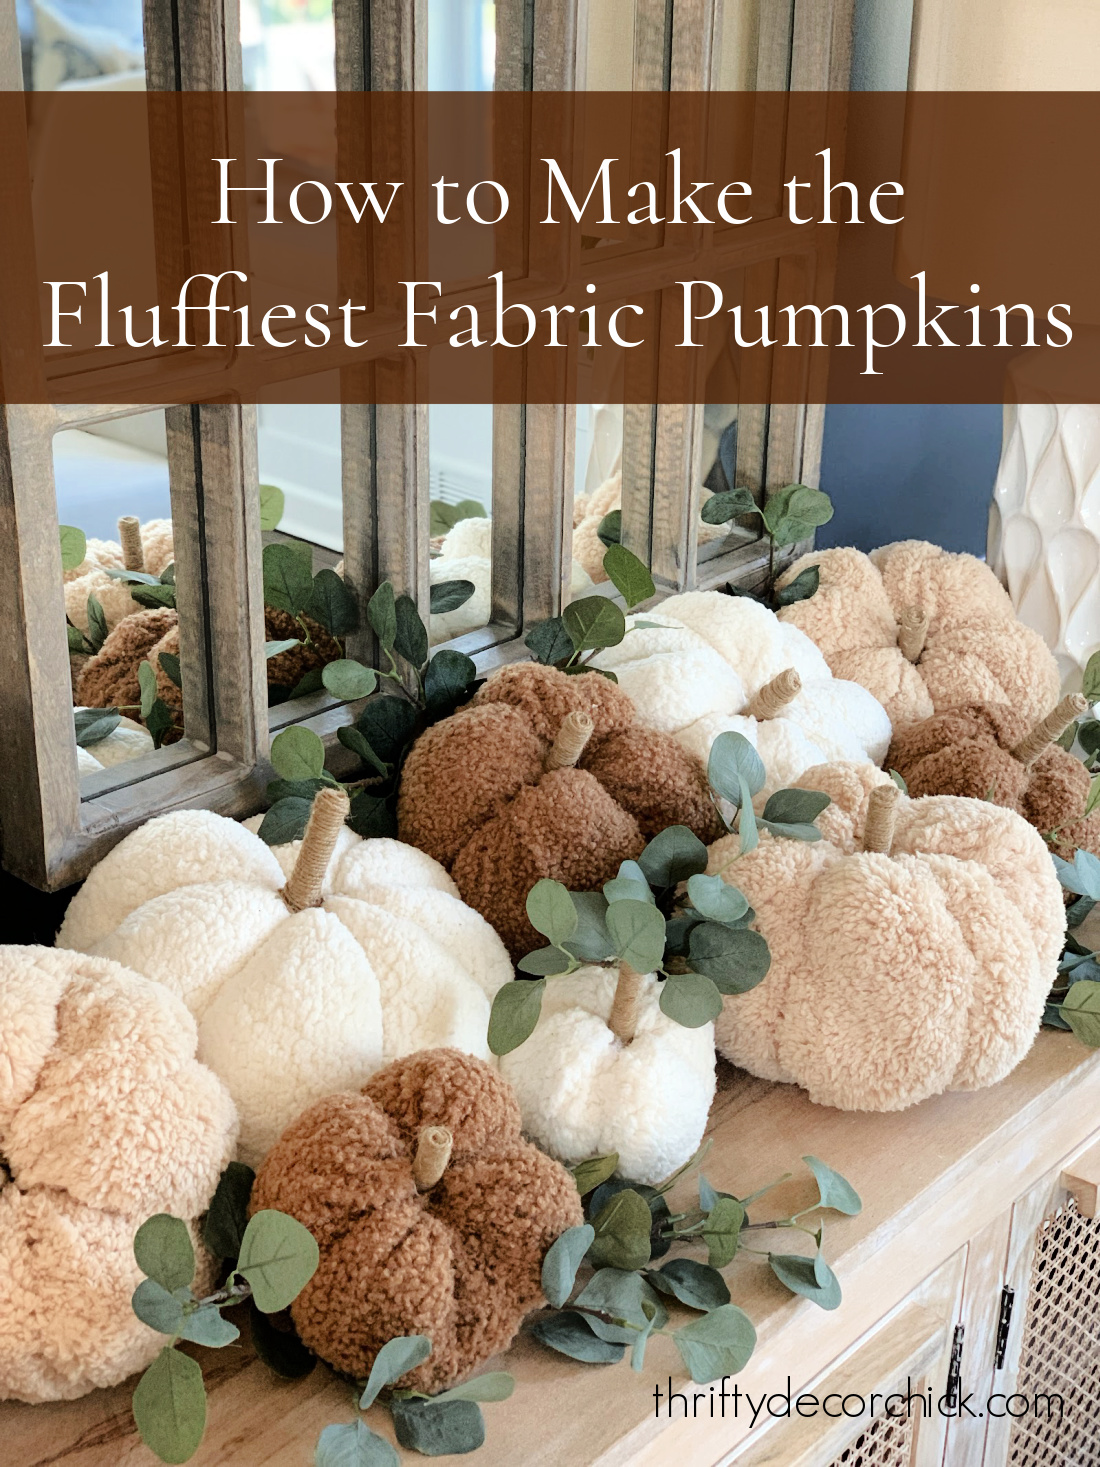
How to make the softest fabric pumpkin pillows with no a stitching device. 

An uncomplicated knock off of the Pottery Barn teddy bear pumpkins! 

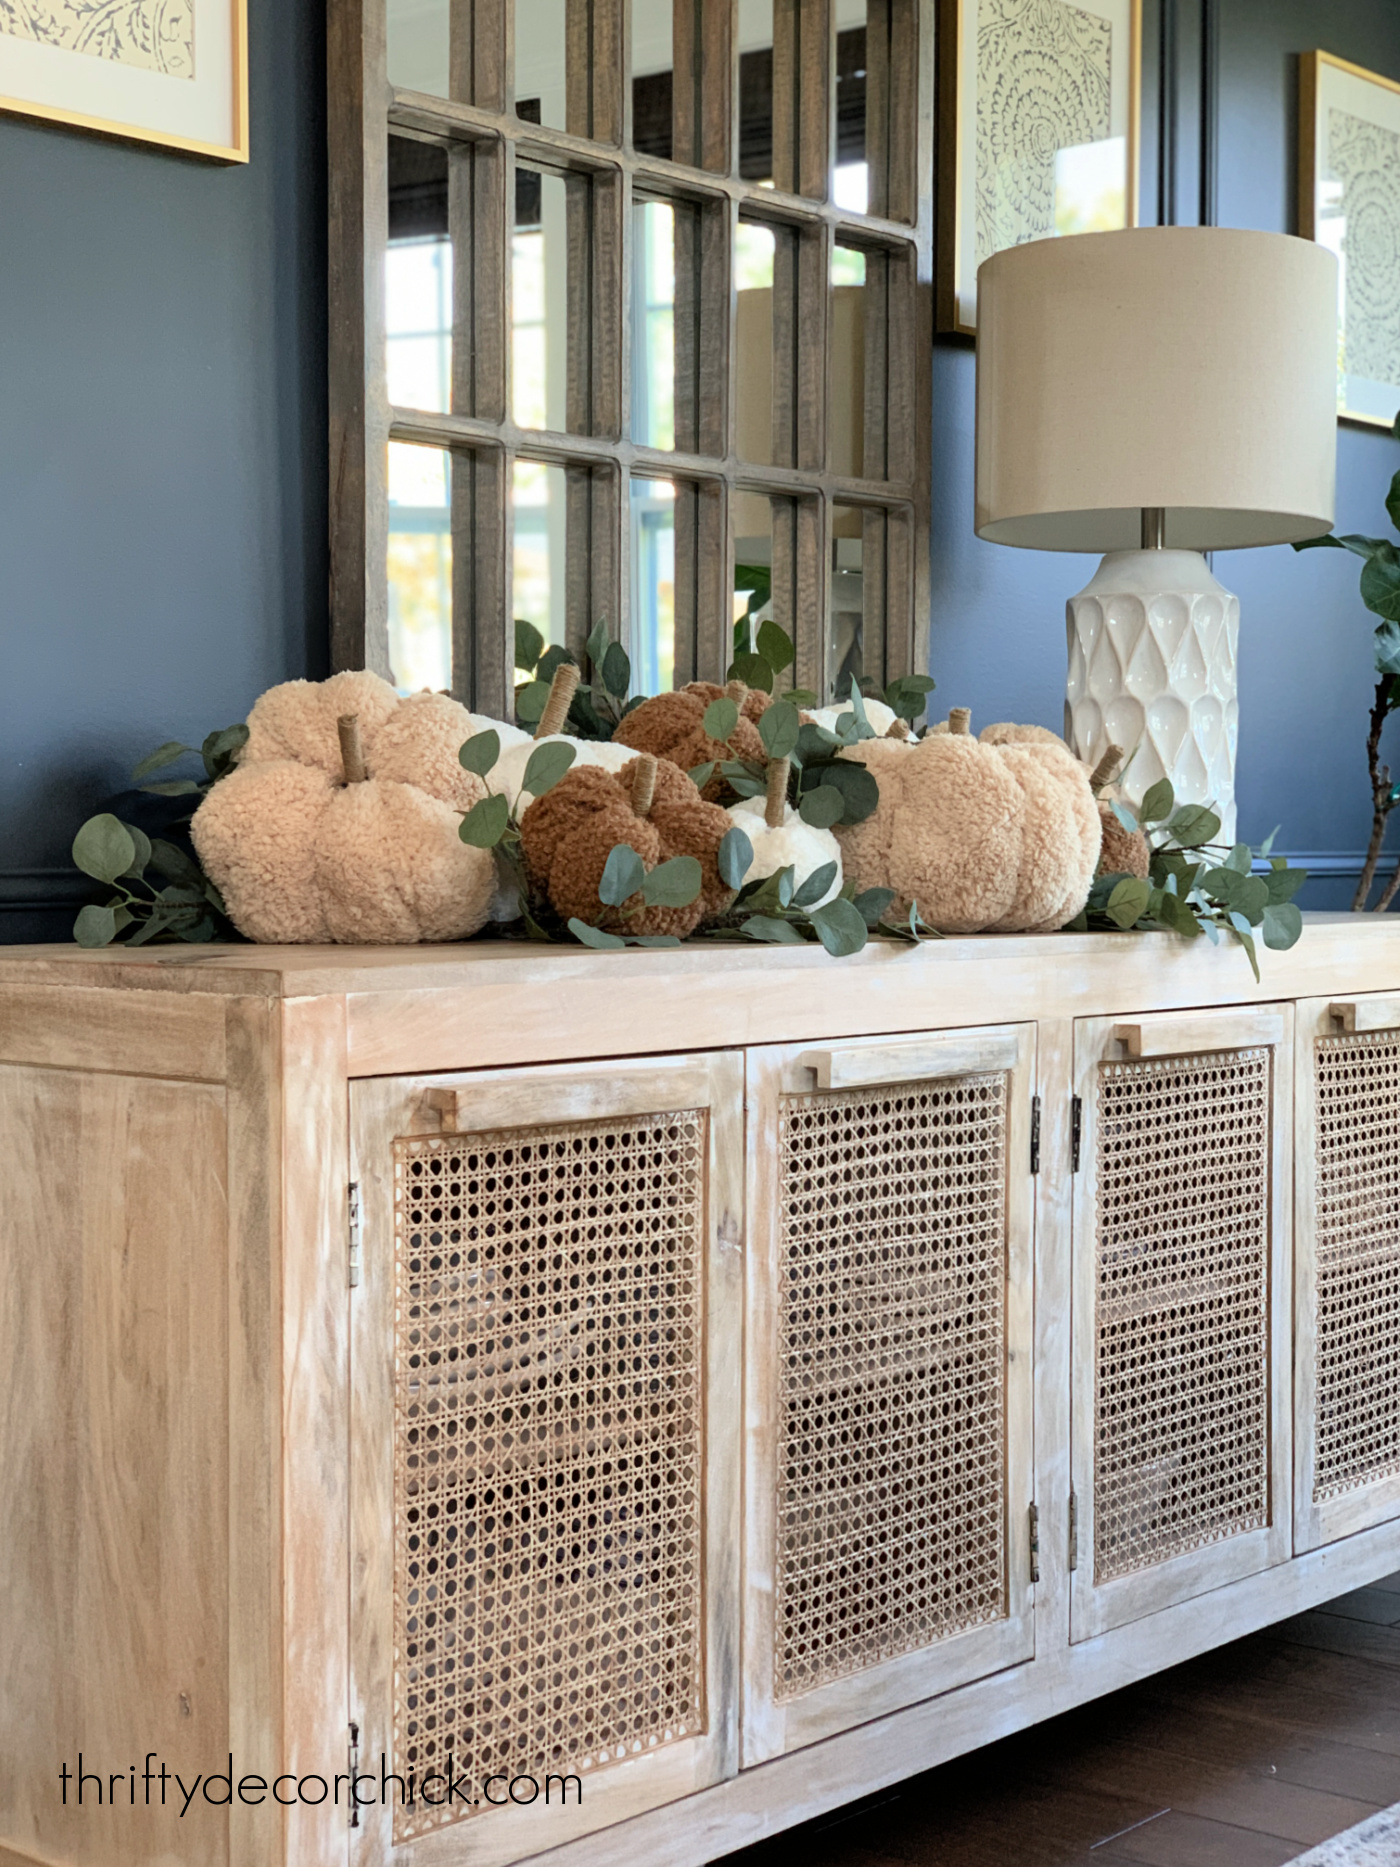
These sweet stuffed pumpkins are SO soft and will seem terrific in your tumble decor, or would perform as adorable pillows on chairs or sofas. It’s straightforward to make material pumpkins and no sewing equipment or knowledge is needed. 

I arrived across the most lovable stuffed pumpkins on the internet a couple months ago and knew I had to make some of my own. 

This publish may well contain affiliate backlinks for your convenience. 

But the cost…nope. At least when I realized I could recreate them for a fraction of what they are charging. 

I went to the craft store in lookup of the softest, fluffiest fabric I could discover. I obtained 3 shades in very similar materials — one particular light-weight cream, one medium brown and just one dim brown. 

They are all SO Gentle and cozy. I just loved all 3. The dark material is what I consider is considered the accurate “teddy bear” cloth, but they all worked fantastically for this challenge. 

I’ve hardly ever made my very own cloth pumpkins, but I figured it out along the way. My to start with method worked Ok, but then I did a very little analysis and will be sharing the guidelines I finished up making use of for the relaxation of the pumpkins. 

This Diy fabric pumpkin how-to will operate with both equally the fluffy fabrics I am applying and thinner options for cotton or velvet pumpkins. 

First up, slice a rounded sq. or circle out of your fabric in the size you want: 

The width of your material will rely on the measurement you want for your pumpkin. I produced my large pumpkin with a sizing about 16-18 inches throughout. 

I extremely propose cloth scissors if you work on tasks like this frequently — they make it way a lot easier to slash, primarily fluffy things like this!

It turns out you really you should not have to minimize down your cloth corners — I observed it actually worked good to leave it a square form. The corners assist fill in the middle portion in which your stem will go afterwards. 

On my initially consider, I just only collected all of the cloth at the major, wrapped it with twine to protected and then minimize off of the extra. 

I was left with this part: 

no sew fabric pumpkins

I flipped it about and additional my “stem” at the best. It was a minimal complicated to wrangle all of the cloth together and tie it, and the stem was not secured effectively when I was done. 

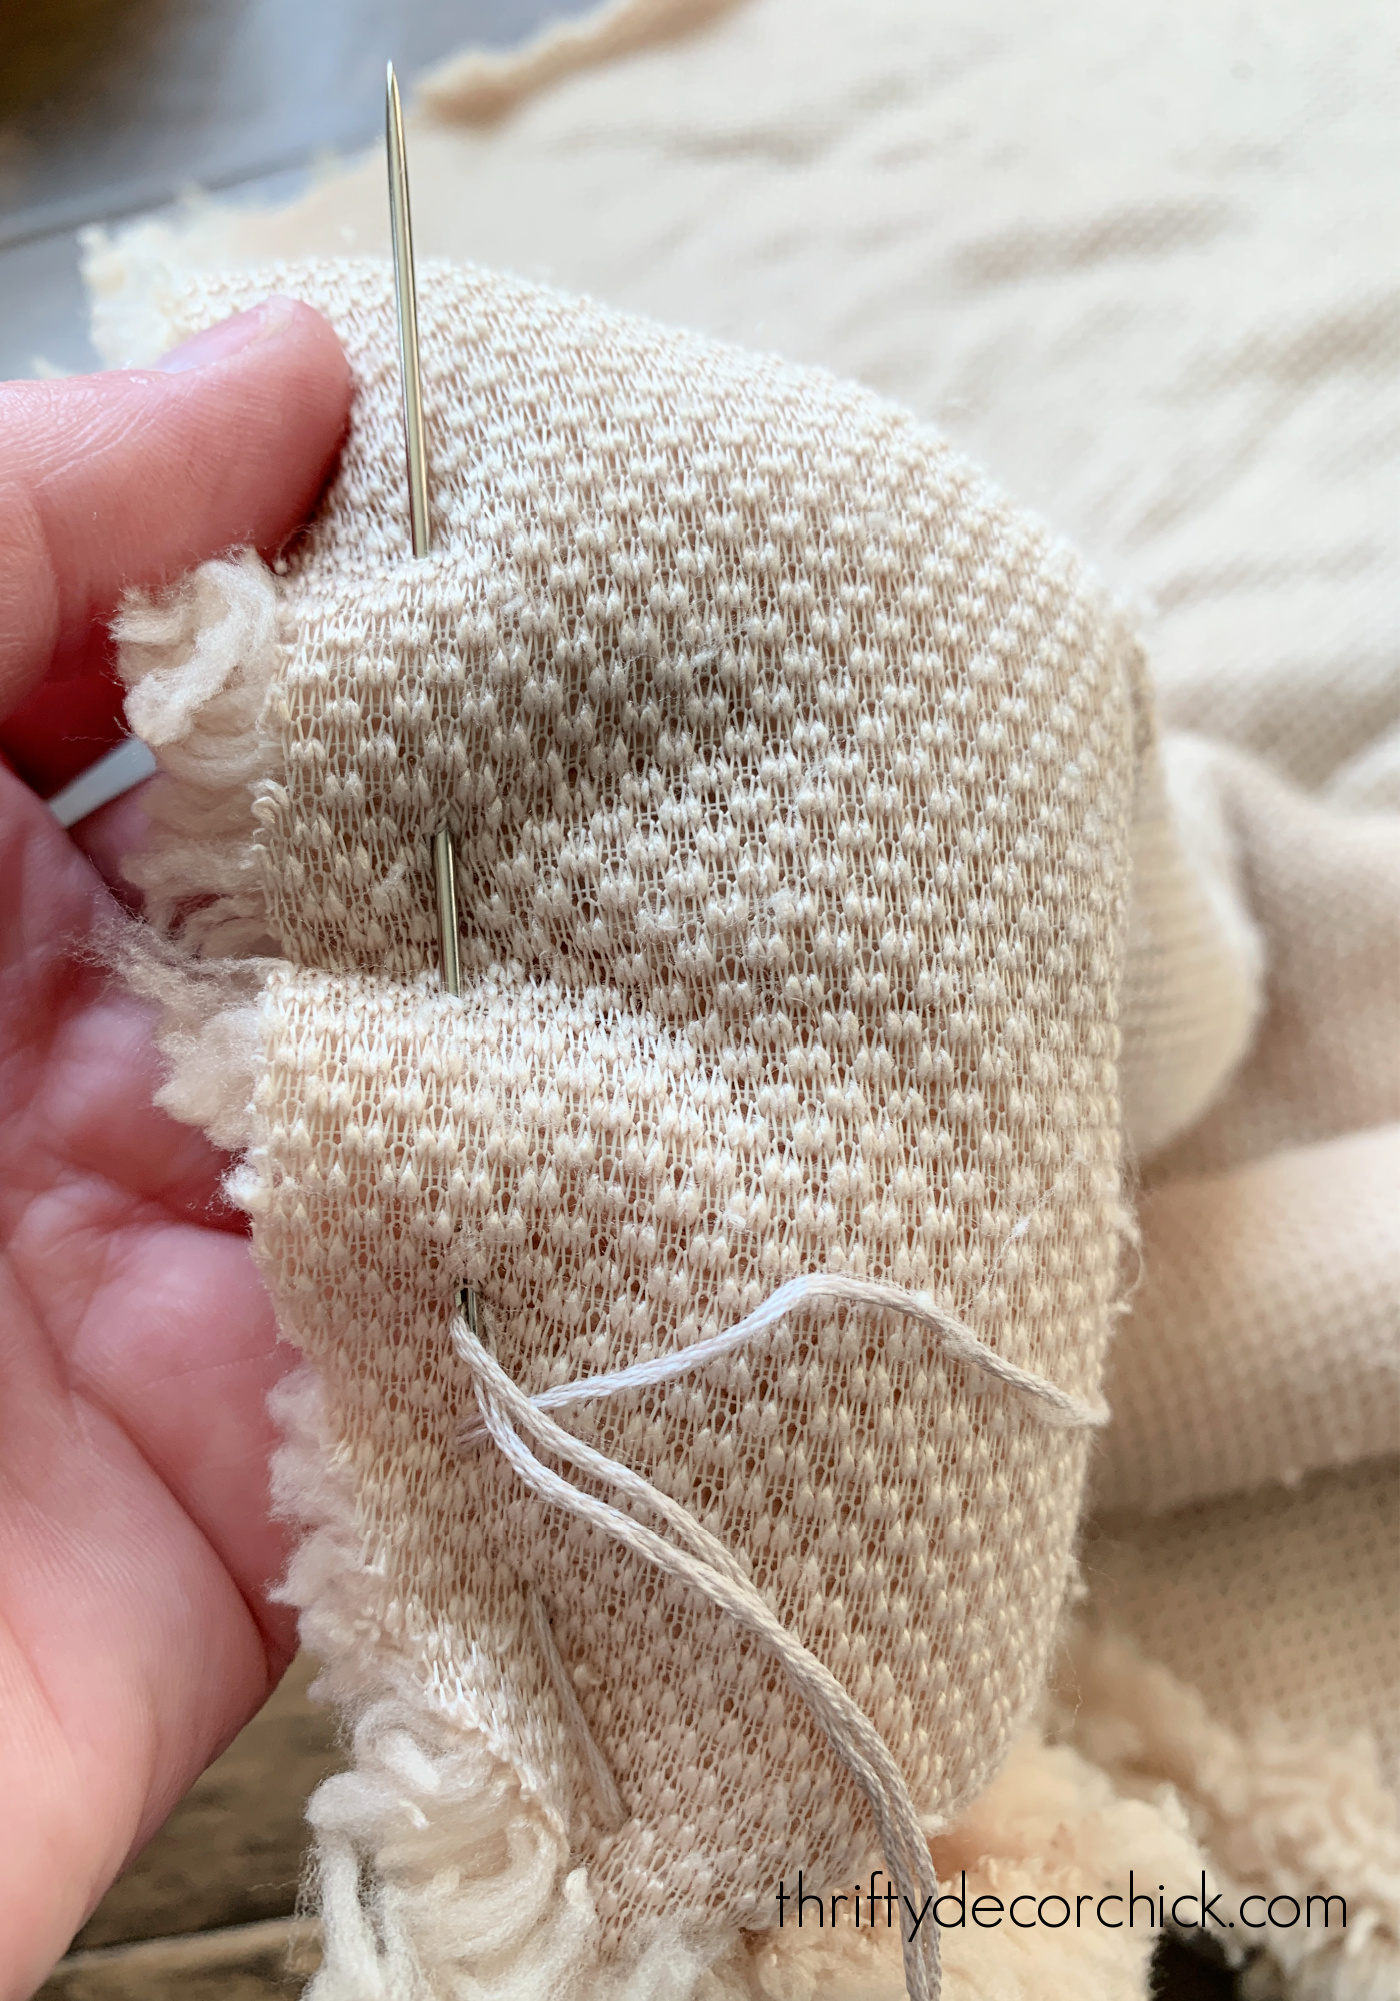
So I switched to this method, which was seriously effortless with this fabric. 

easy sewing fabric pumpkins

This goes super fast and I promise you you should not have to have to know any stitching knowledge to do this. Just weave it in and out like I did earlier mentioned. 

It would not will need to be excellent — you will not likely even see the thread when you happen to be completed!

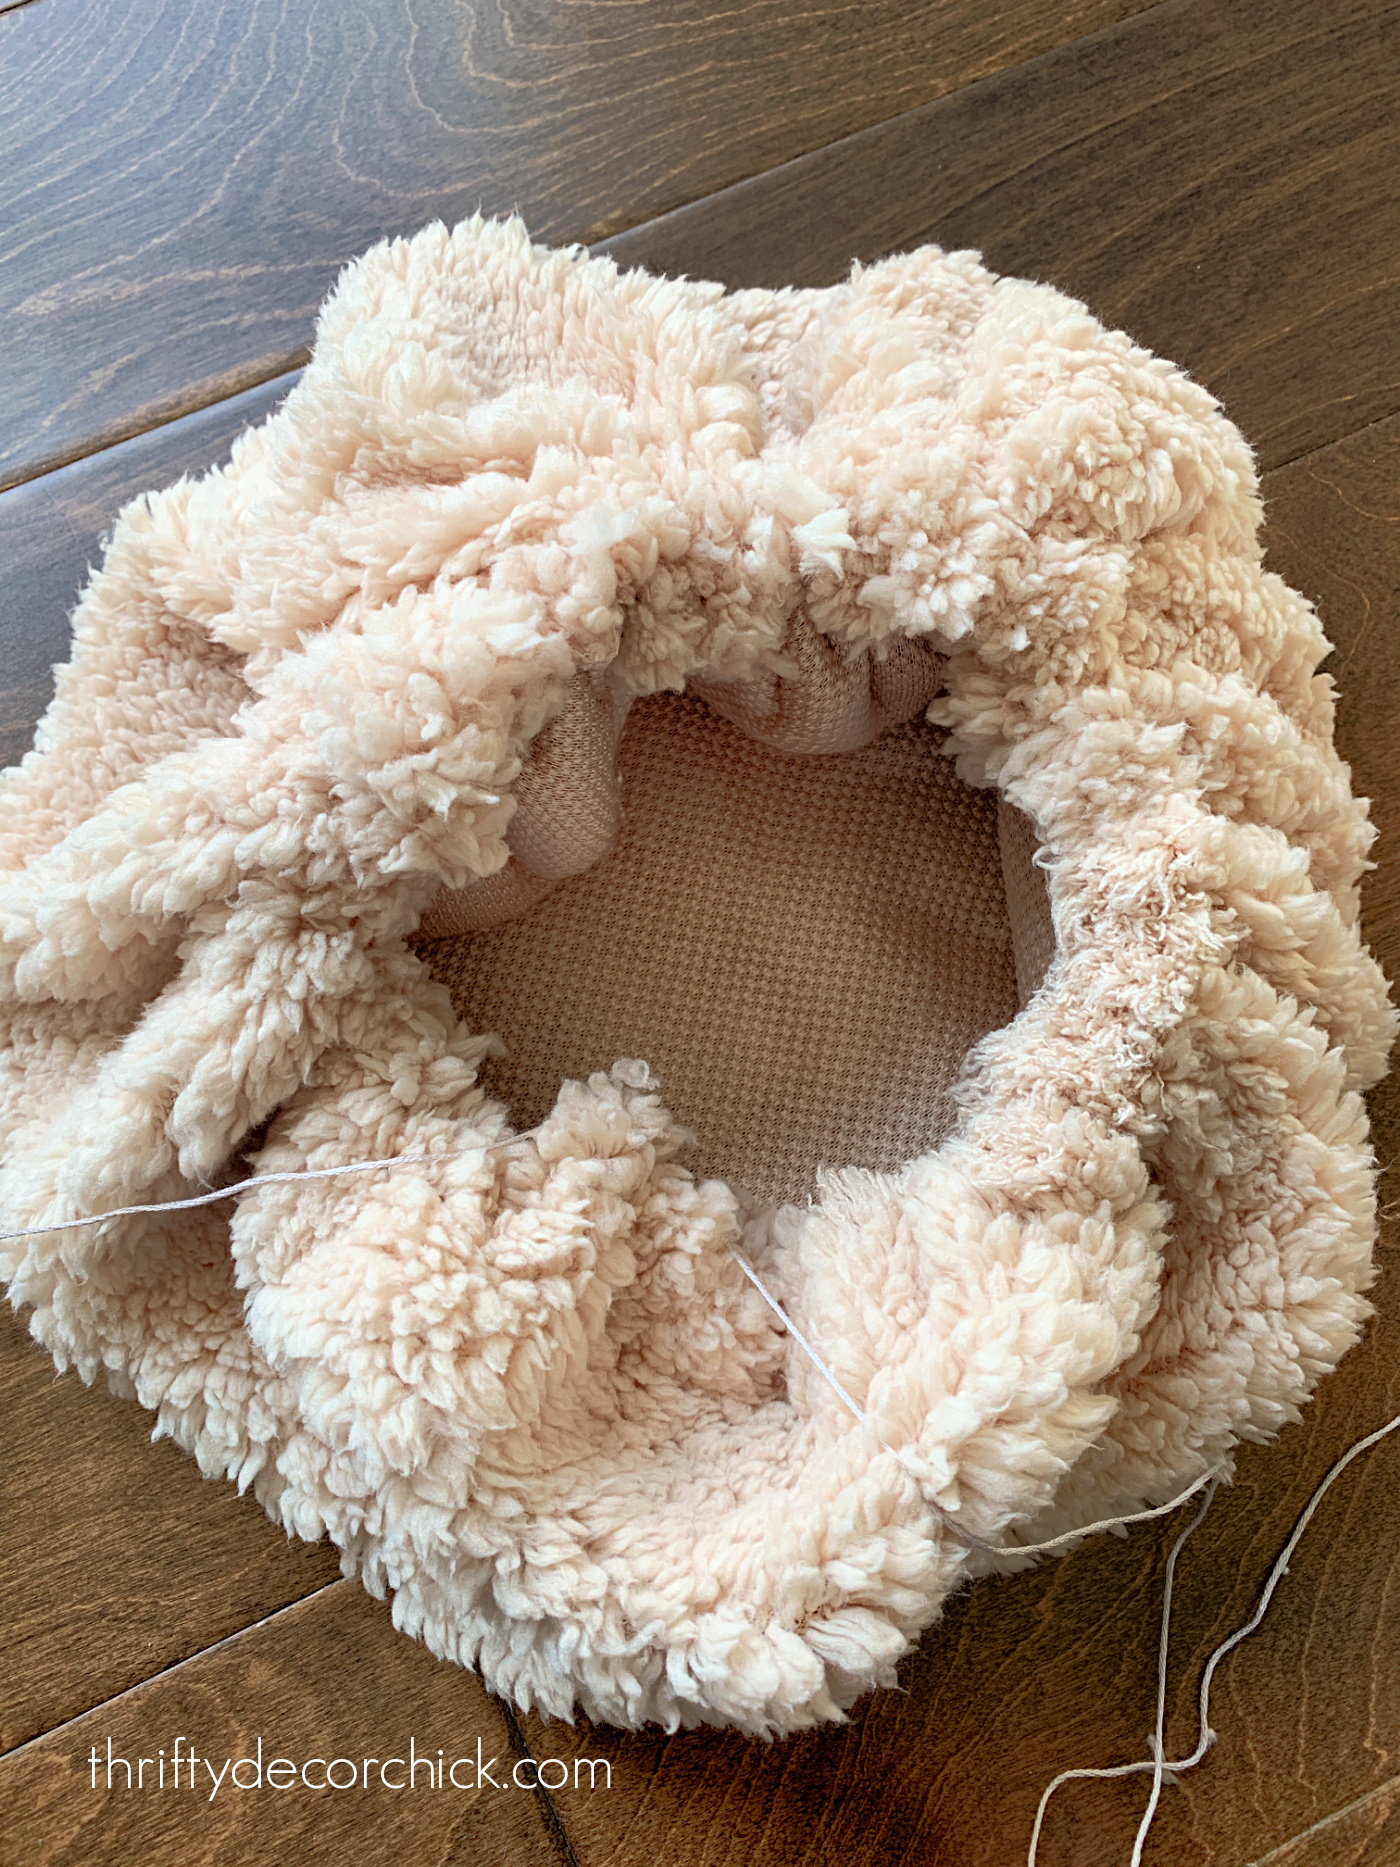
The moment you’ve got got it all over the circumference of the fabric, you can just take every close of the embroidery thread and pull them alongside one another to start closing the pumpkin like so: 

fabric pumpkins no sewing machine
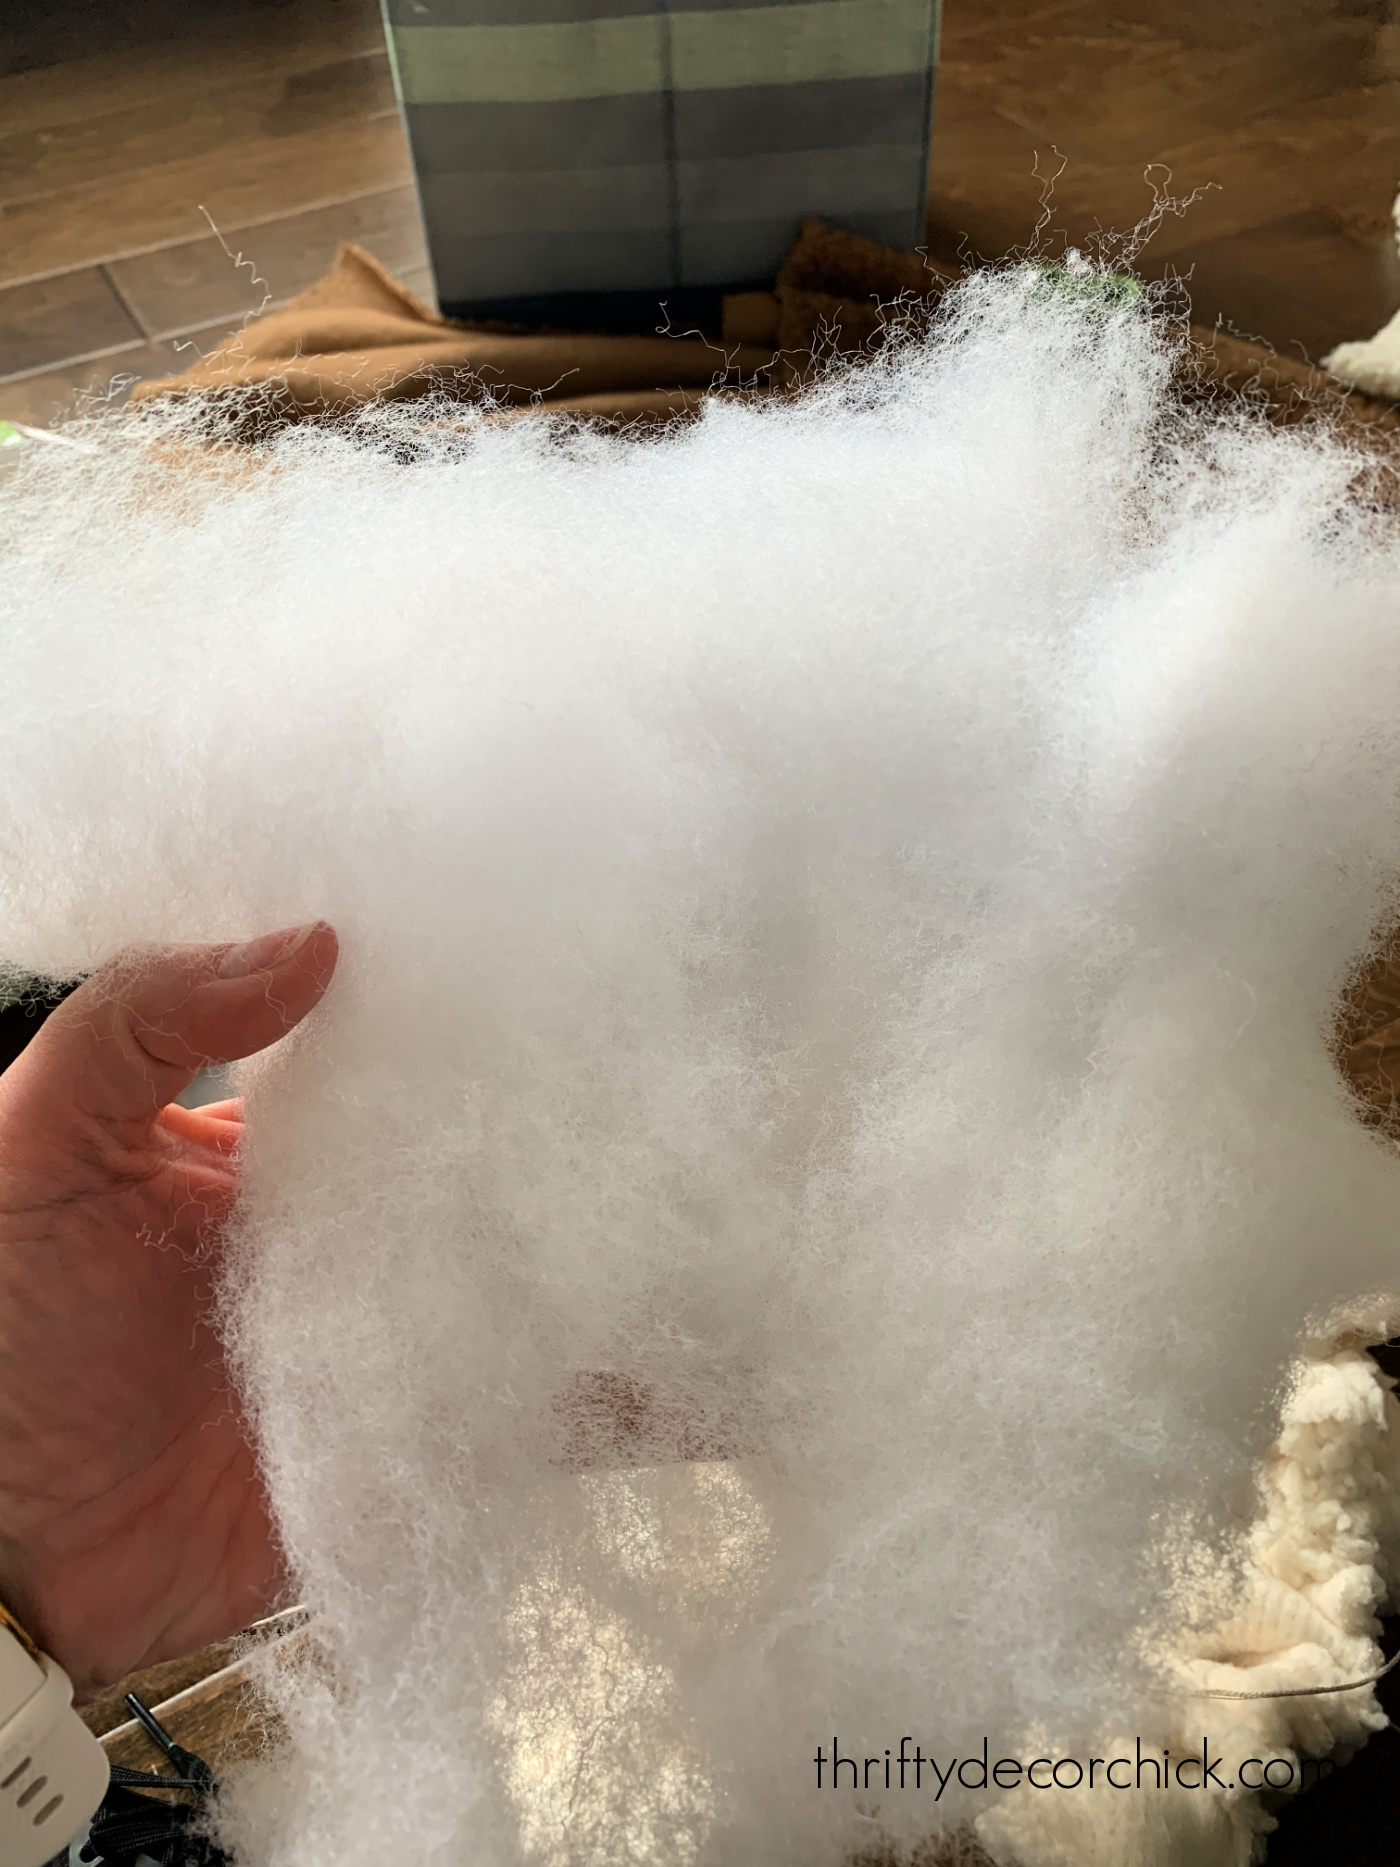
Right before you near it all the way up, you can expect to want to start out filling it with fiber fill. I utilised about two and a 50 percent one pound luggage to do 9 stuffed pumpkins. 

I normally advocate pulling the fill apart a number of times to fluff it up ahead of inserting: 

fluff up fiber fill

It will go a great deal more if you do this initially!

I do not suggest stuffing it fully entire at this stage, as it is really more challenging to shut if overstuffed. You are going to want to add some more stuffing to fill up areas later on.

Once you’ve acquired it stuffed up to your liking (pull your thread together at the major to see how complete it is), you can tie it up, but leave some some space for your stem and for a minor remaining stuffing!

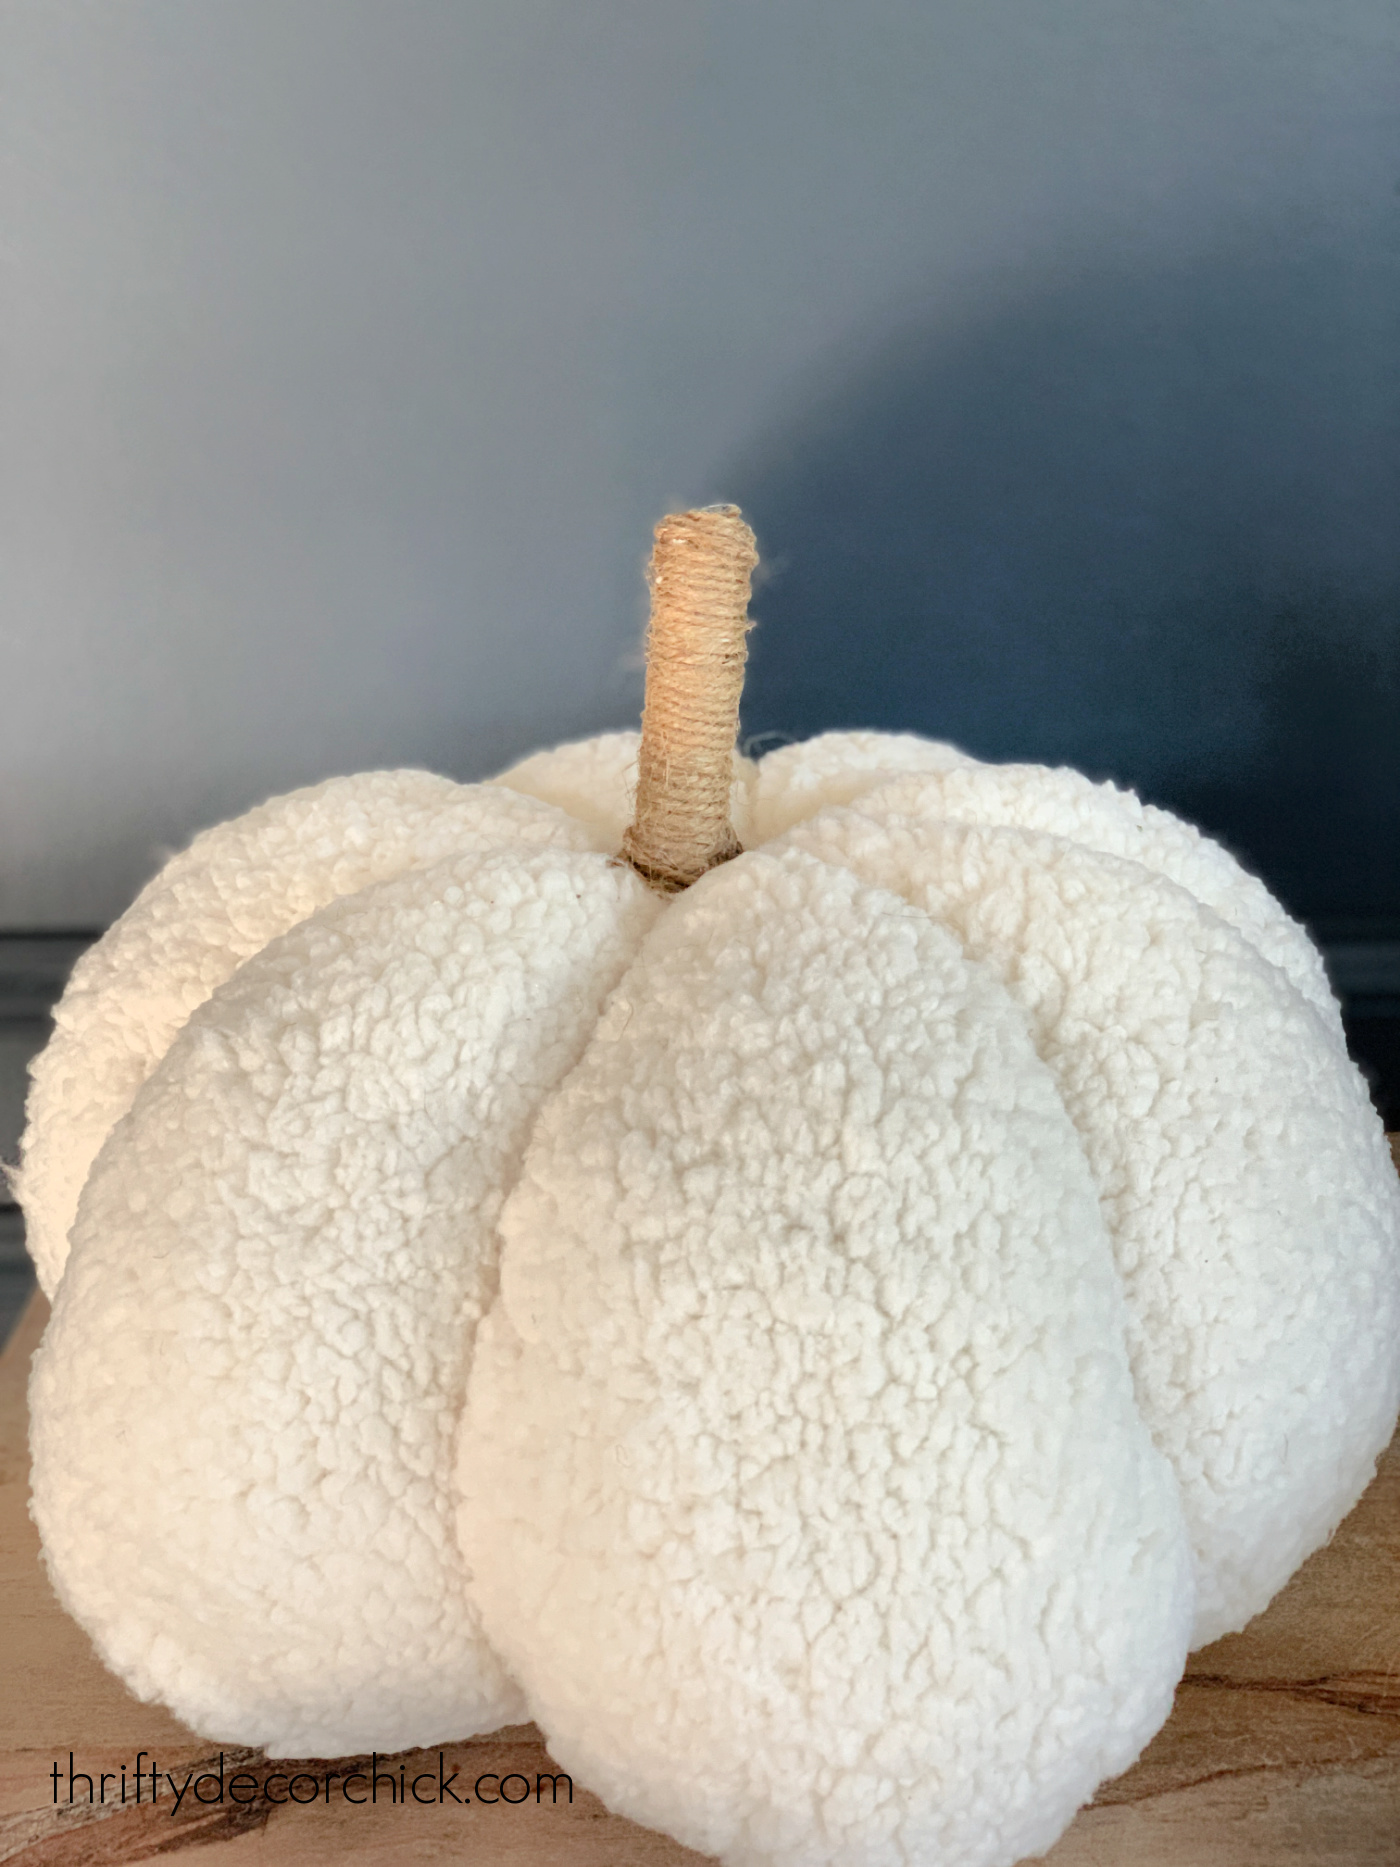
At this position you can insert your stem and be done if you want — the “pillow” will have a shape that presently resembles a pumpkin. 

But I wished the defined sections like the inspiration pillows, and I imagine they just look far more like a genuine pumpkin in any case. 🙂 

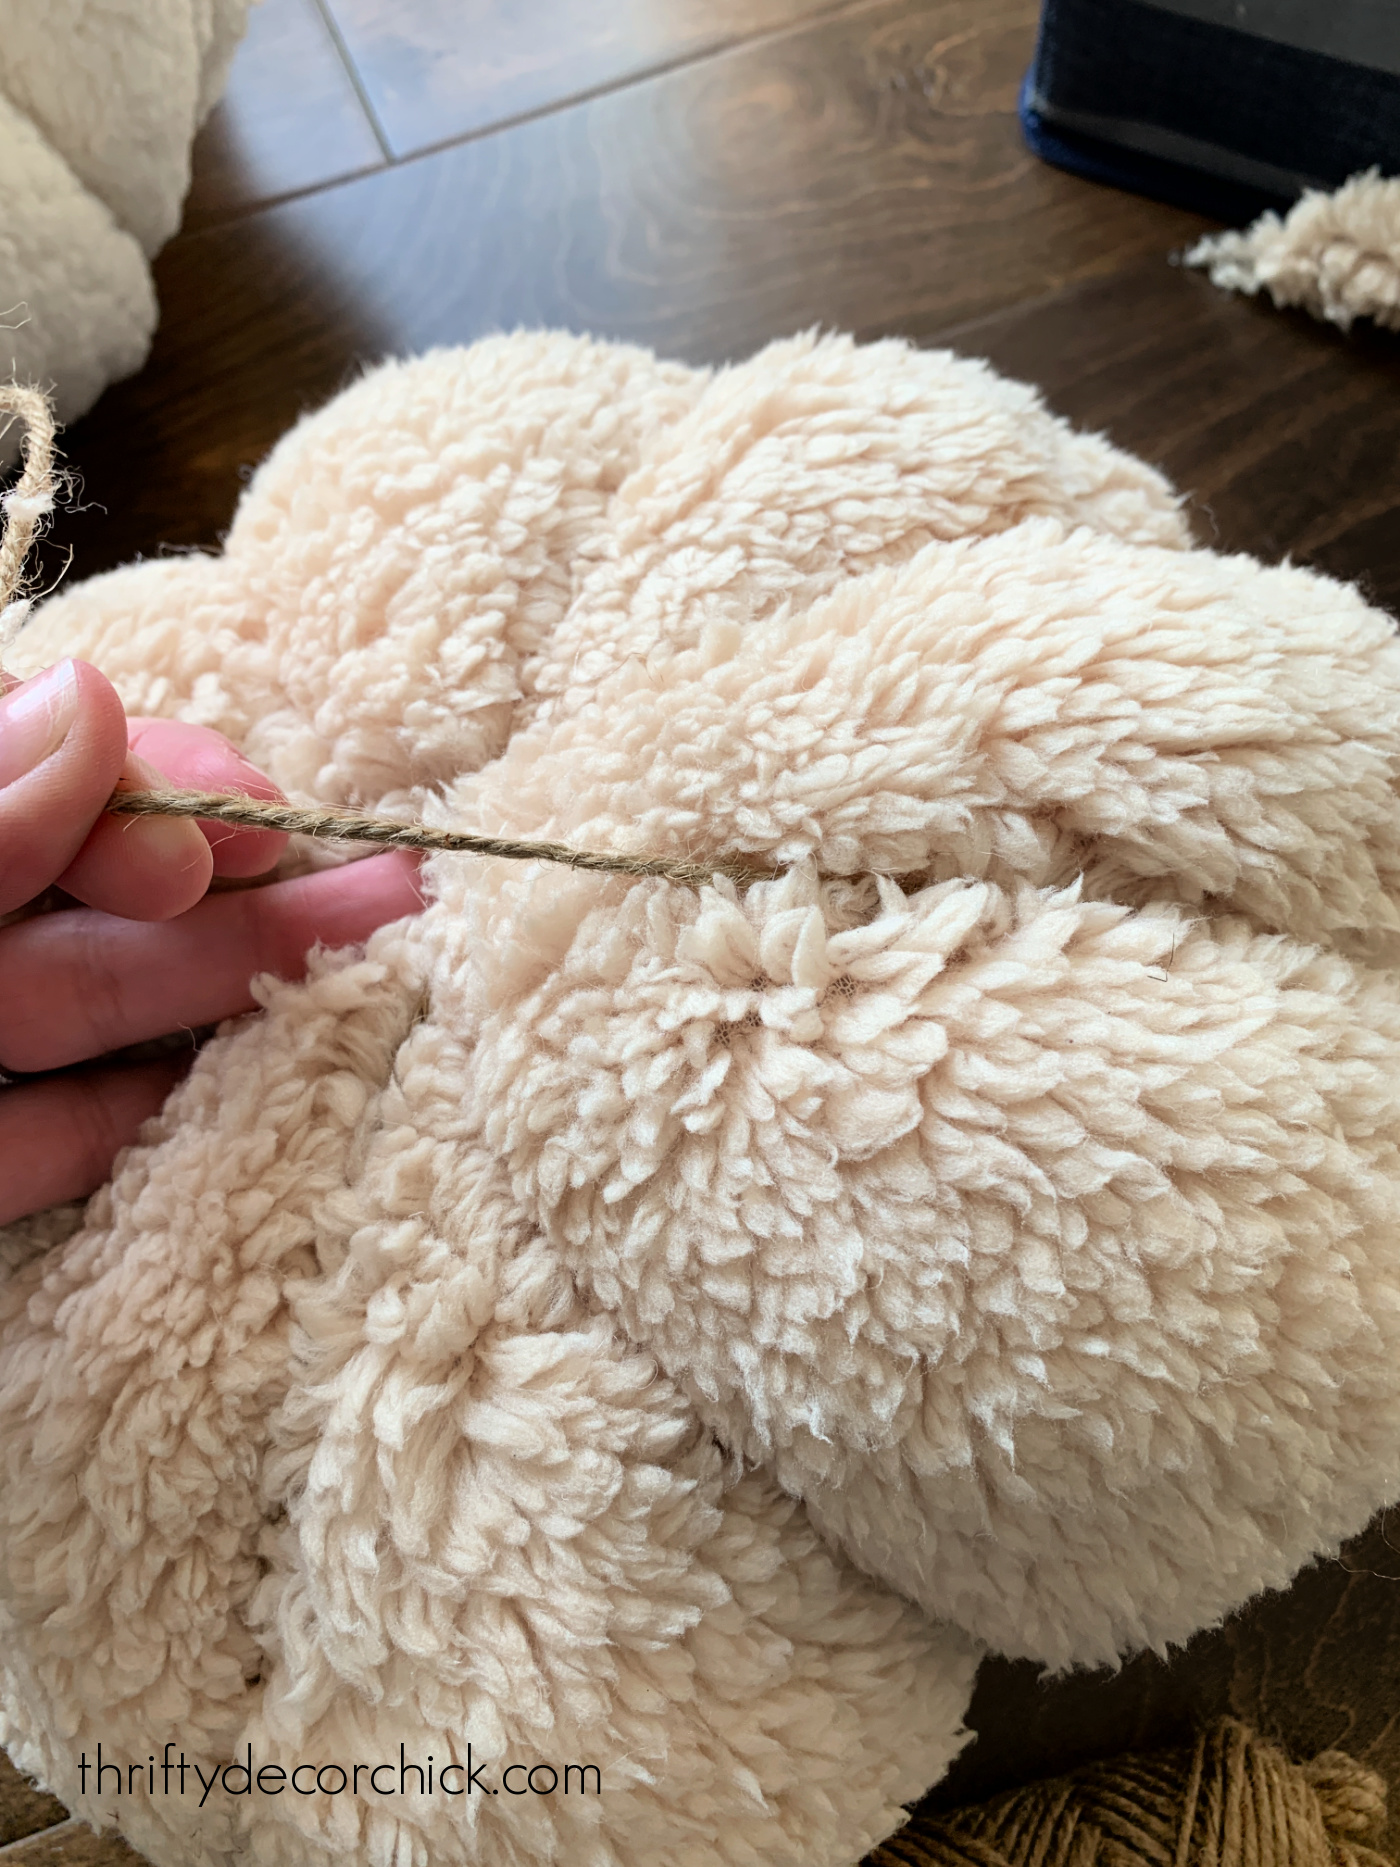
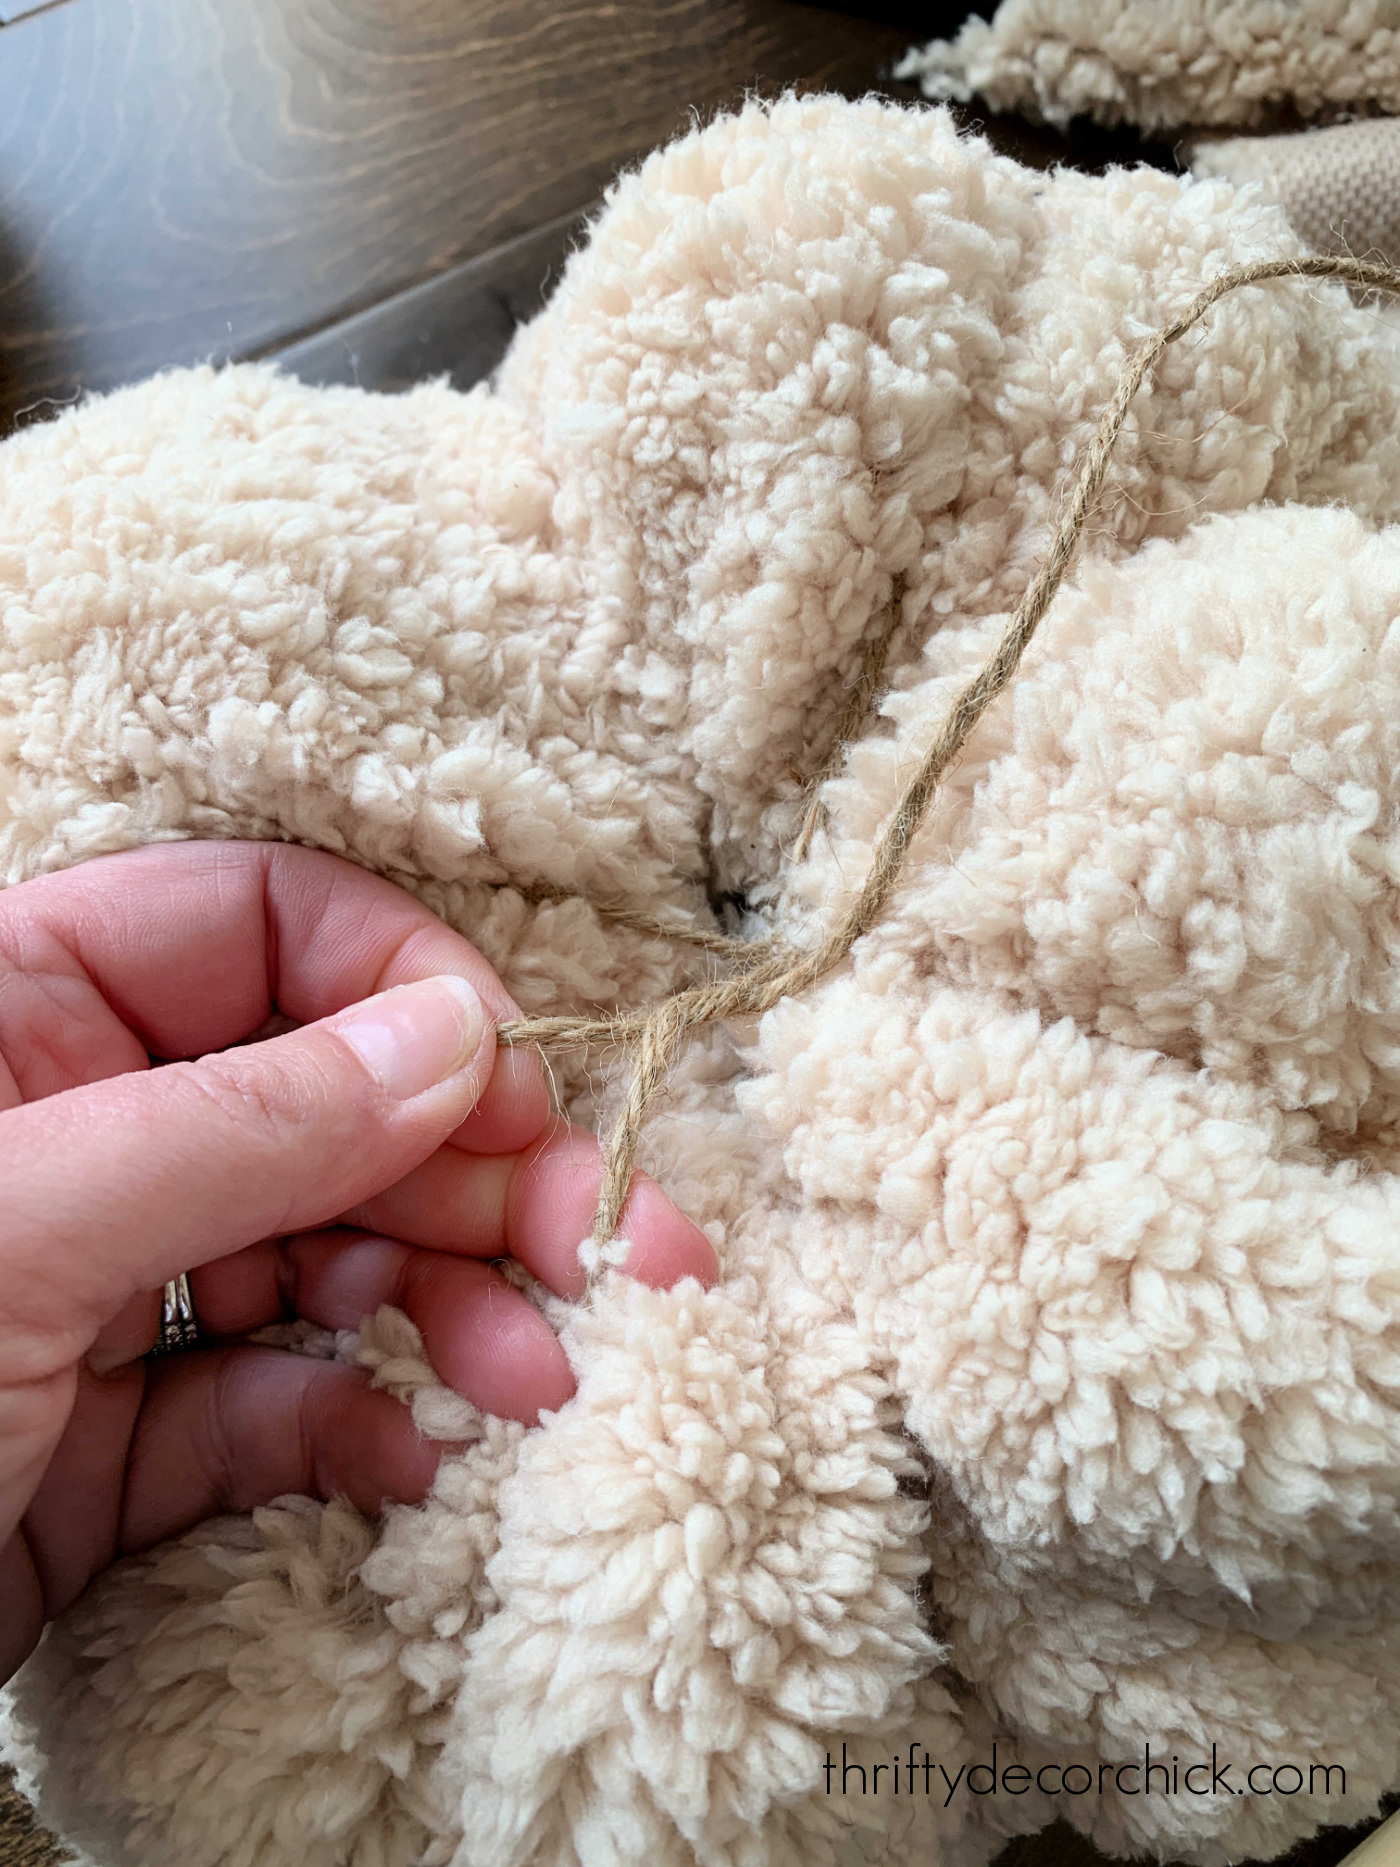
I grabbed my jute twine and started at the top by the hole for the stem, then wrapped the twine tightly all-around the pumpkin back to the top. 

This is a look at of the base of the pumpkin so you can see how I was wrapping the twine all-around: 

fluffy fabric DIY pumpkin tutorial

Leave some excess twine at the best that you can tie each individual go all over the pumpkin to. 

Each and every time you wrap the pumpkin, tie it off in a knot on prime of the pumpkin to maintain the jute as tight as probable: 

using jute to make fabric pumpkins

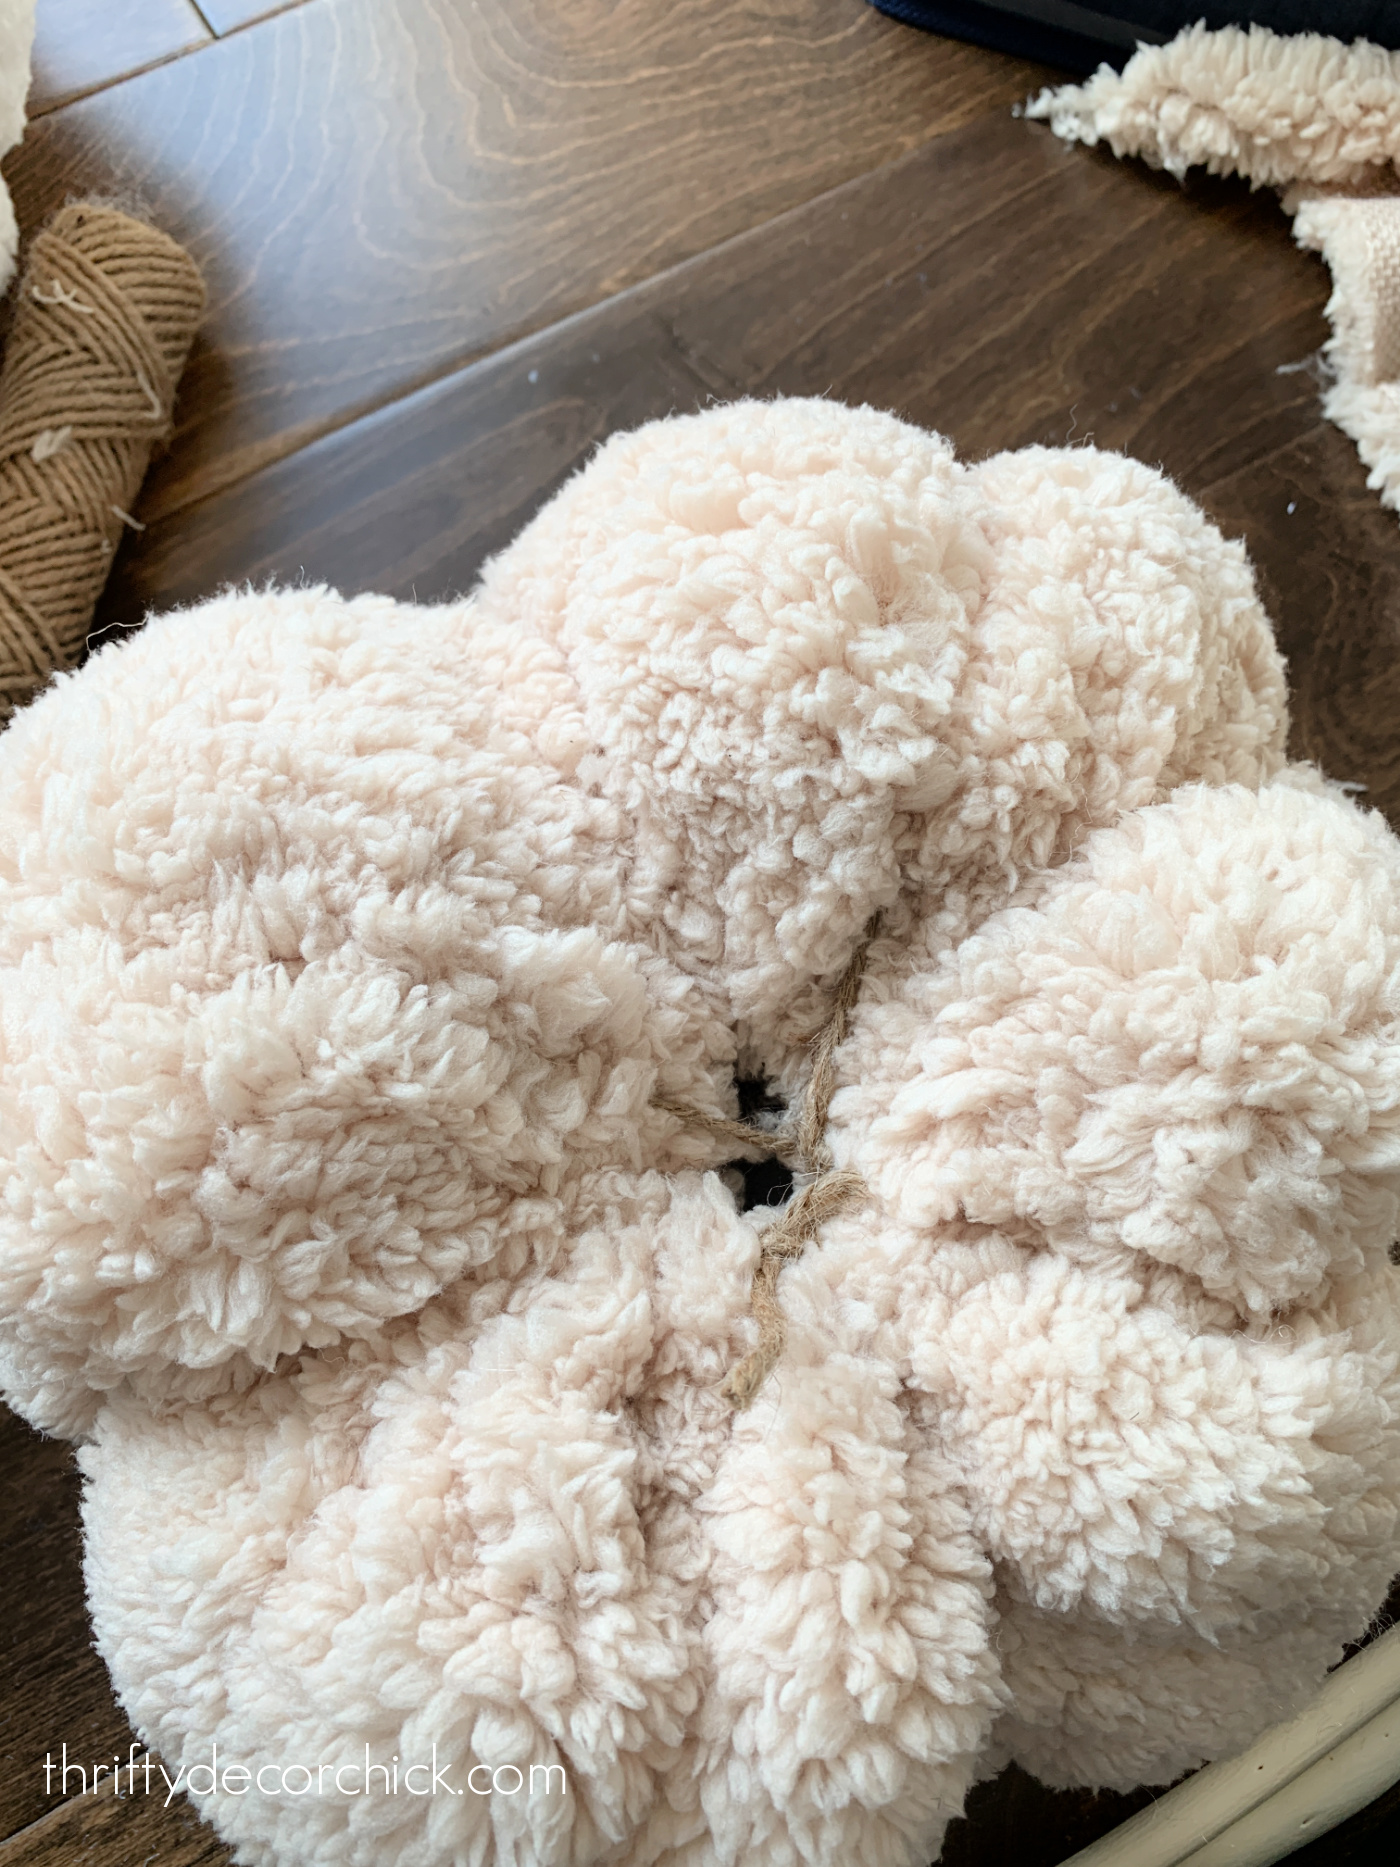
I would wrap with twine, knot it at the top rated to safe, then consider the twine all-around in a further route, knot, and repeat until I experienced all the “sections” I wished.

You’ll be left with a gap that you can still suit a stem into:

how to make fluffy stuffed pumpkins

By the way, I have no clue if this is how it can be “intended” to be done. I was winging this for the most component. 🙂 But it labored very well and went rapidly!


Just before you incorporate the stem, you may want to fluff up the pumpkin a little bit additional. Get far more fiber fill and tuck it within and up into to prime of the pillow to fill in any flat sections. The fluffier the improved!

For the stem you can use just about everything that resembles the condition. Slash branches from outside would perform devoid of any added methods. 

I required ours to be a bit thicker, so I employed the extra stems I utilized for the trunk of my Do it yourself olive tree. 

I lower them down and then wrapped with jute working with my sizzling glue gun: 

DIY pumpkin stem with jute

This course of action would seem laborous but it basically goes super rapid — every single 1 only took a minute or two. 

If I required my stem to be thicker to fill the centre gap a bit a lot more, I just wrapped it with twine twice to make it a bit wider. 

I loaded up the base of the stems with sizzling glue and trapped them into the center of the pumpkins. They usually are not nuts secure — a good deal enough, but I will not be grabbing them by the stem to have them close to. 

(If you know of a much more protected way to add the stem, be sure to share!)

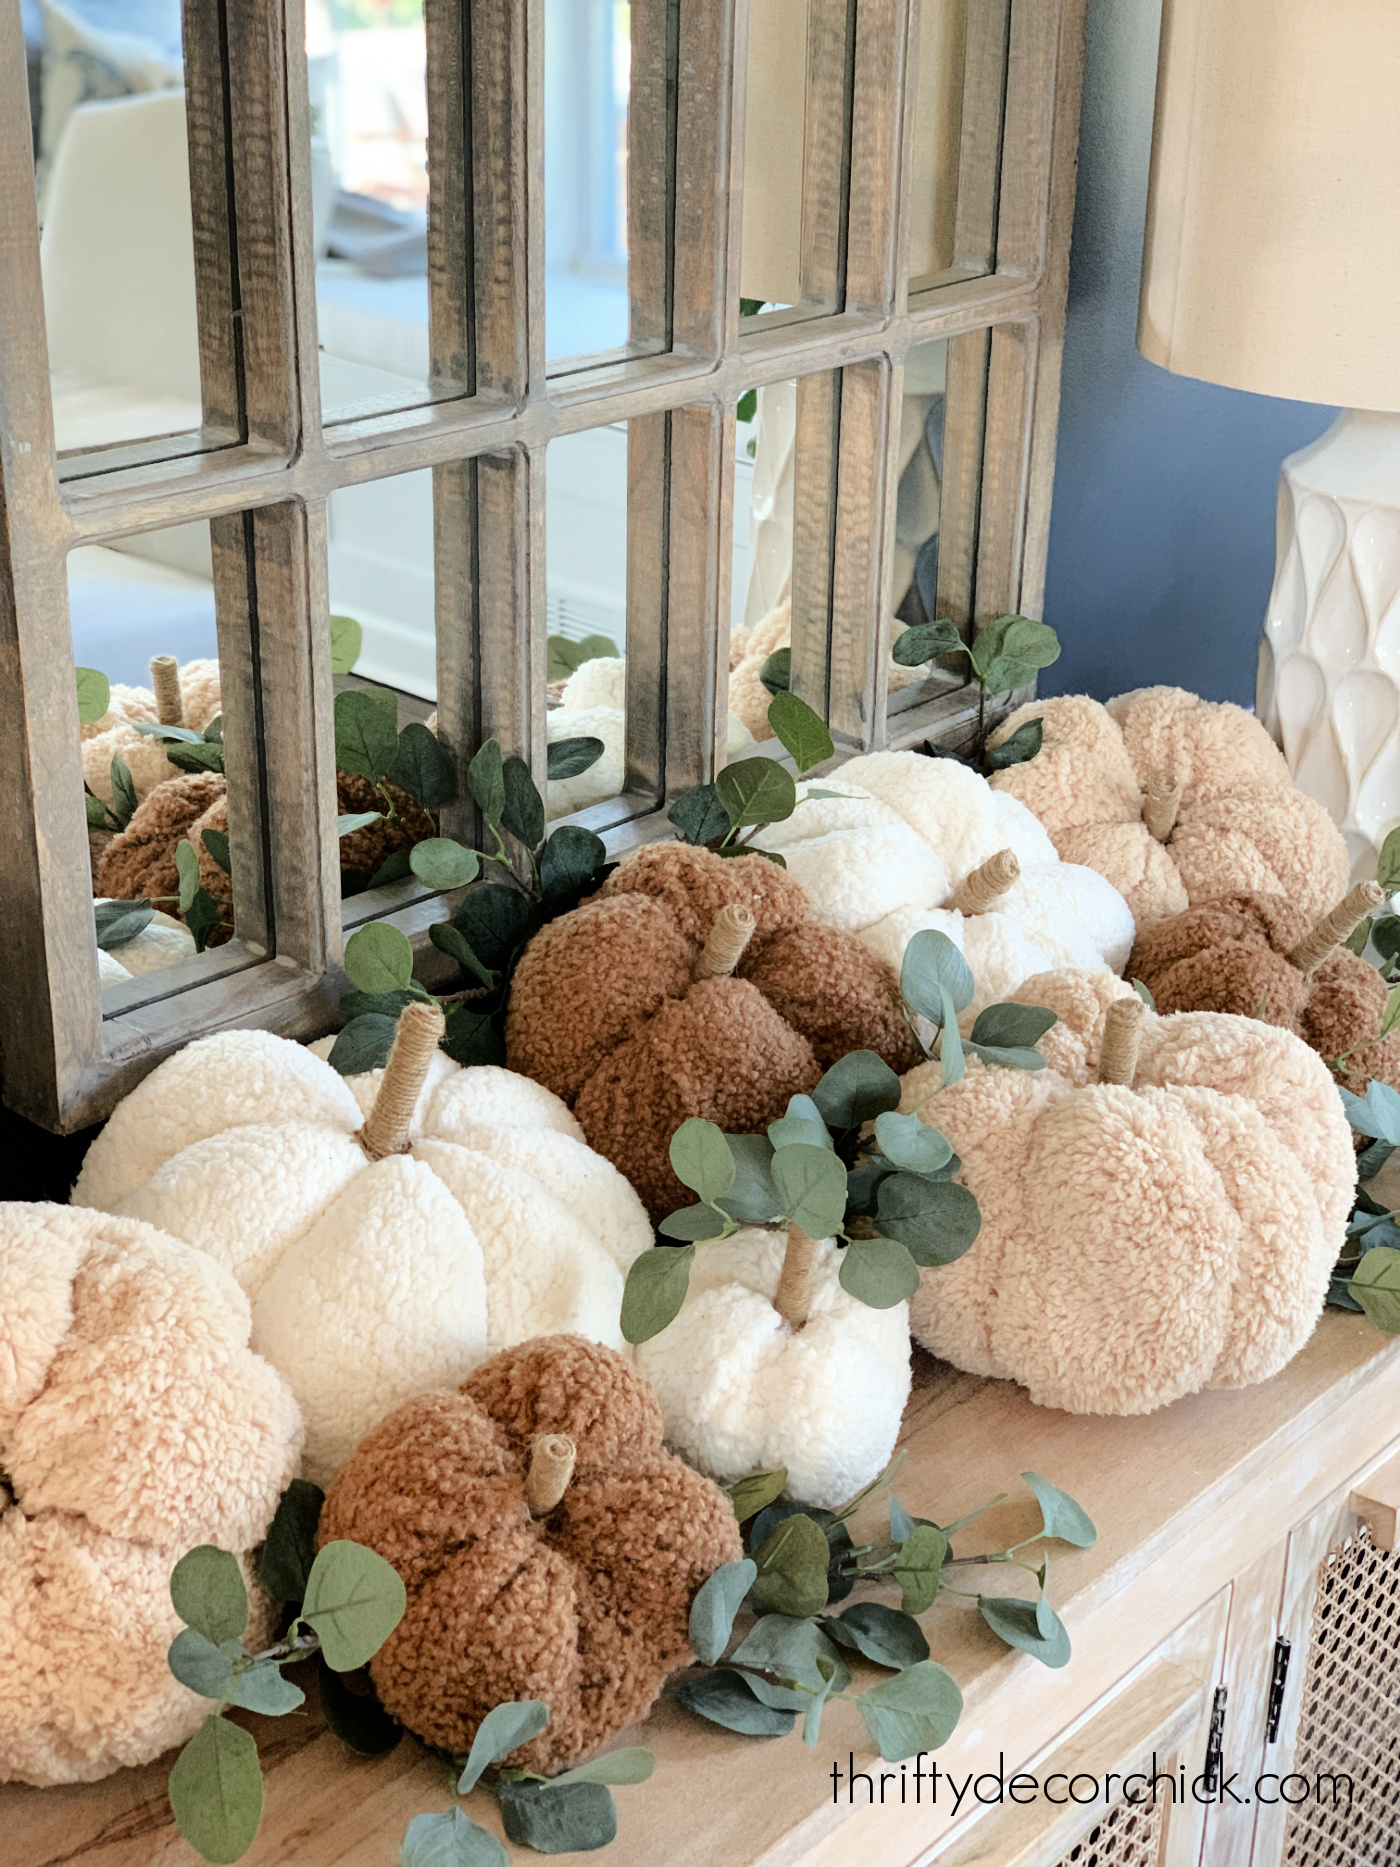
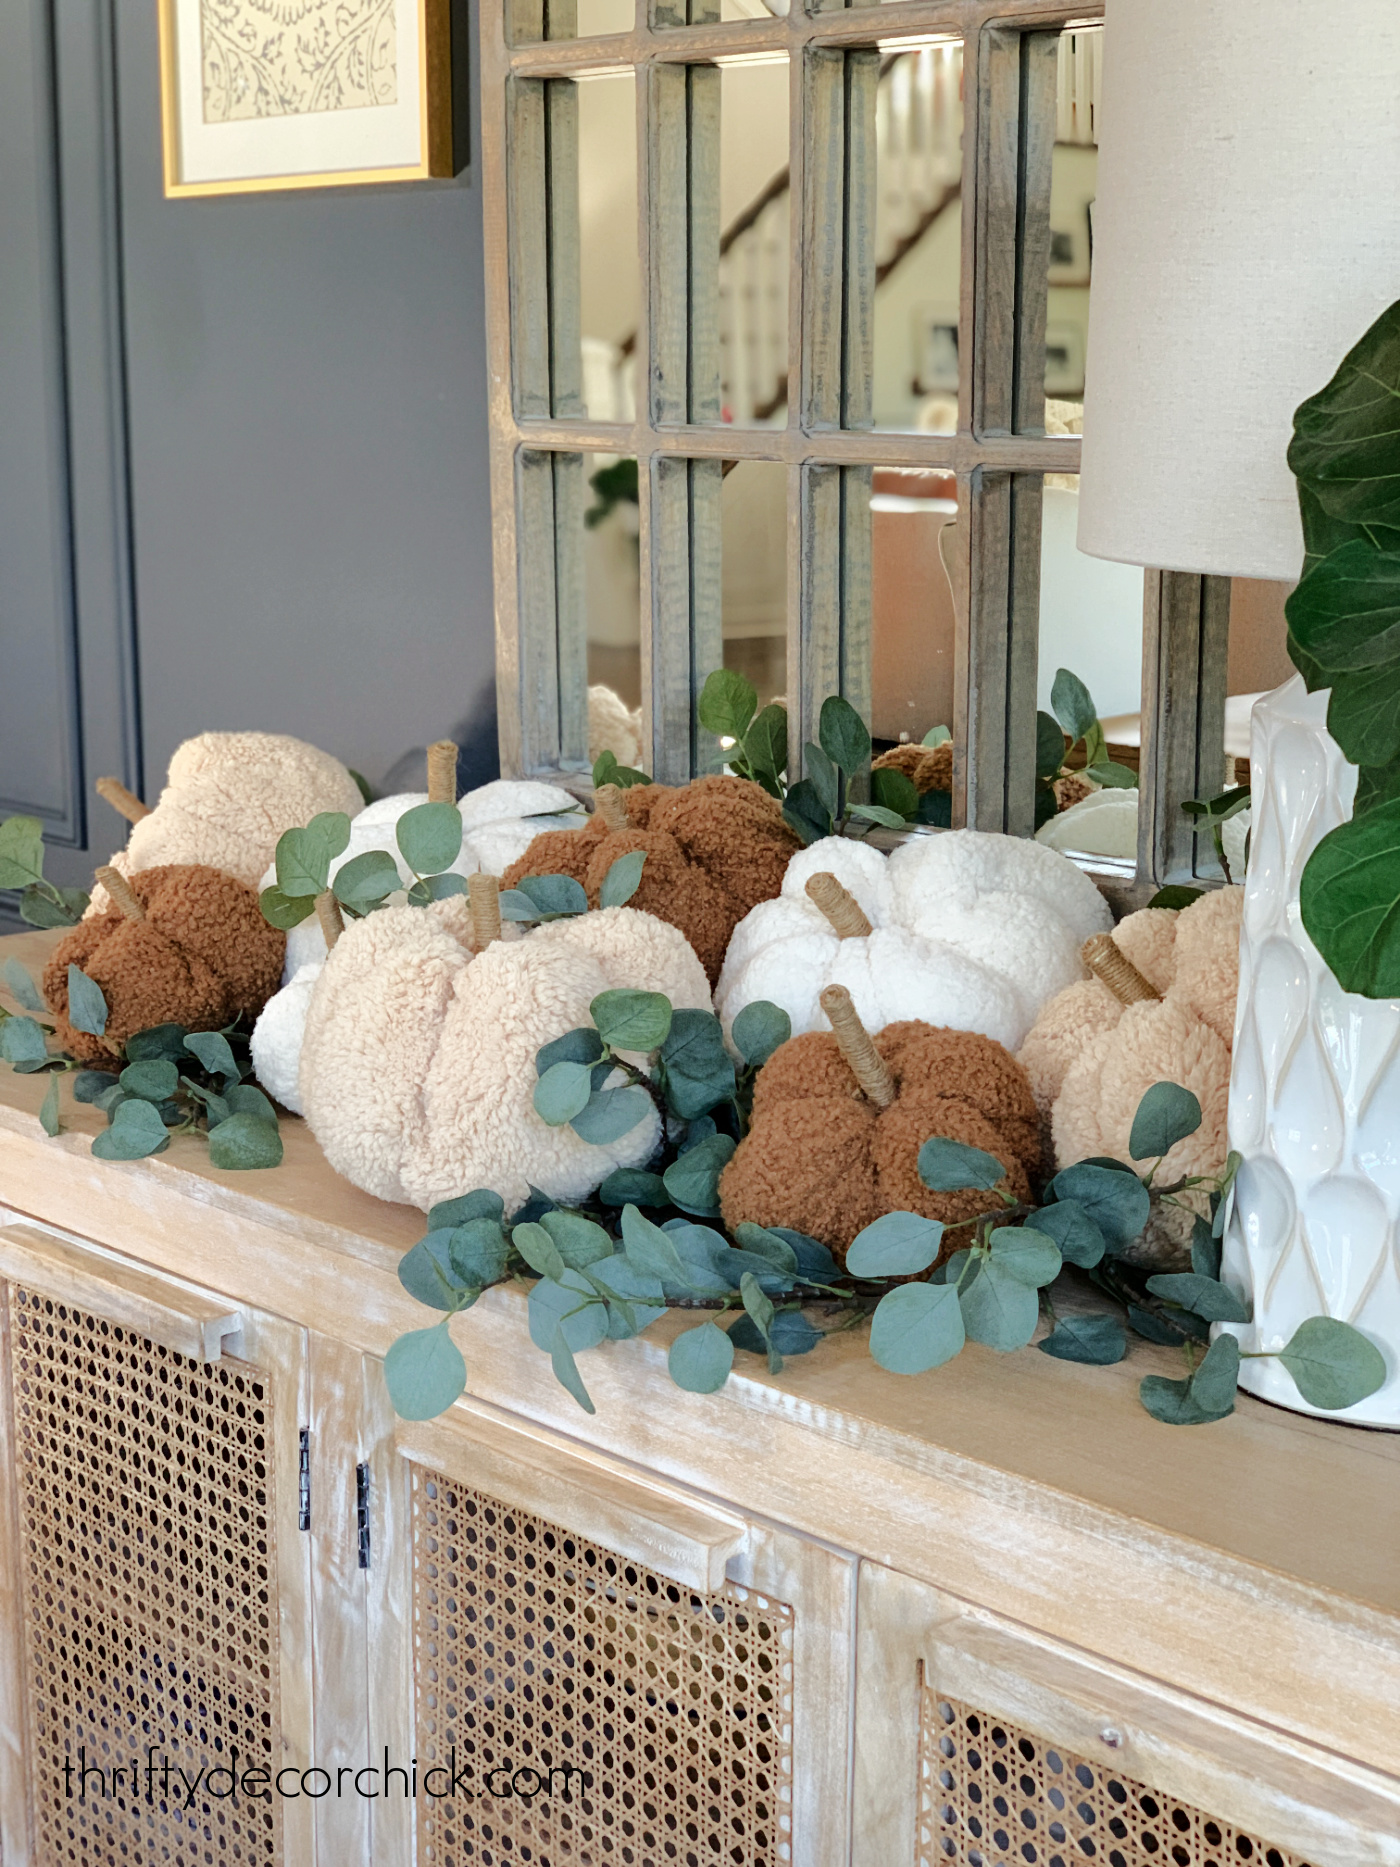
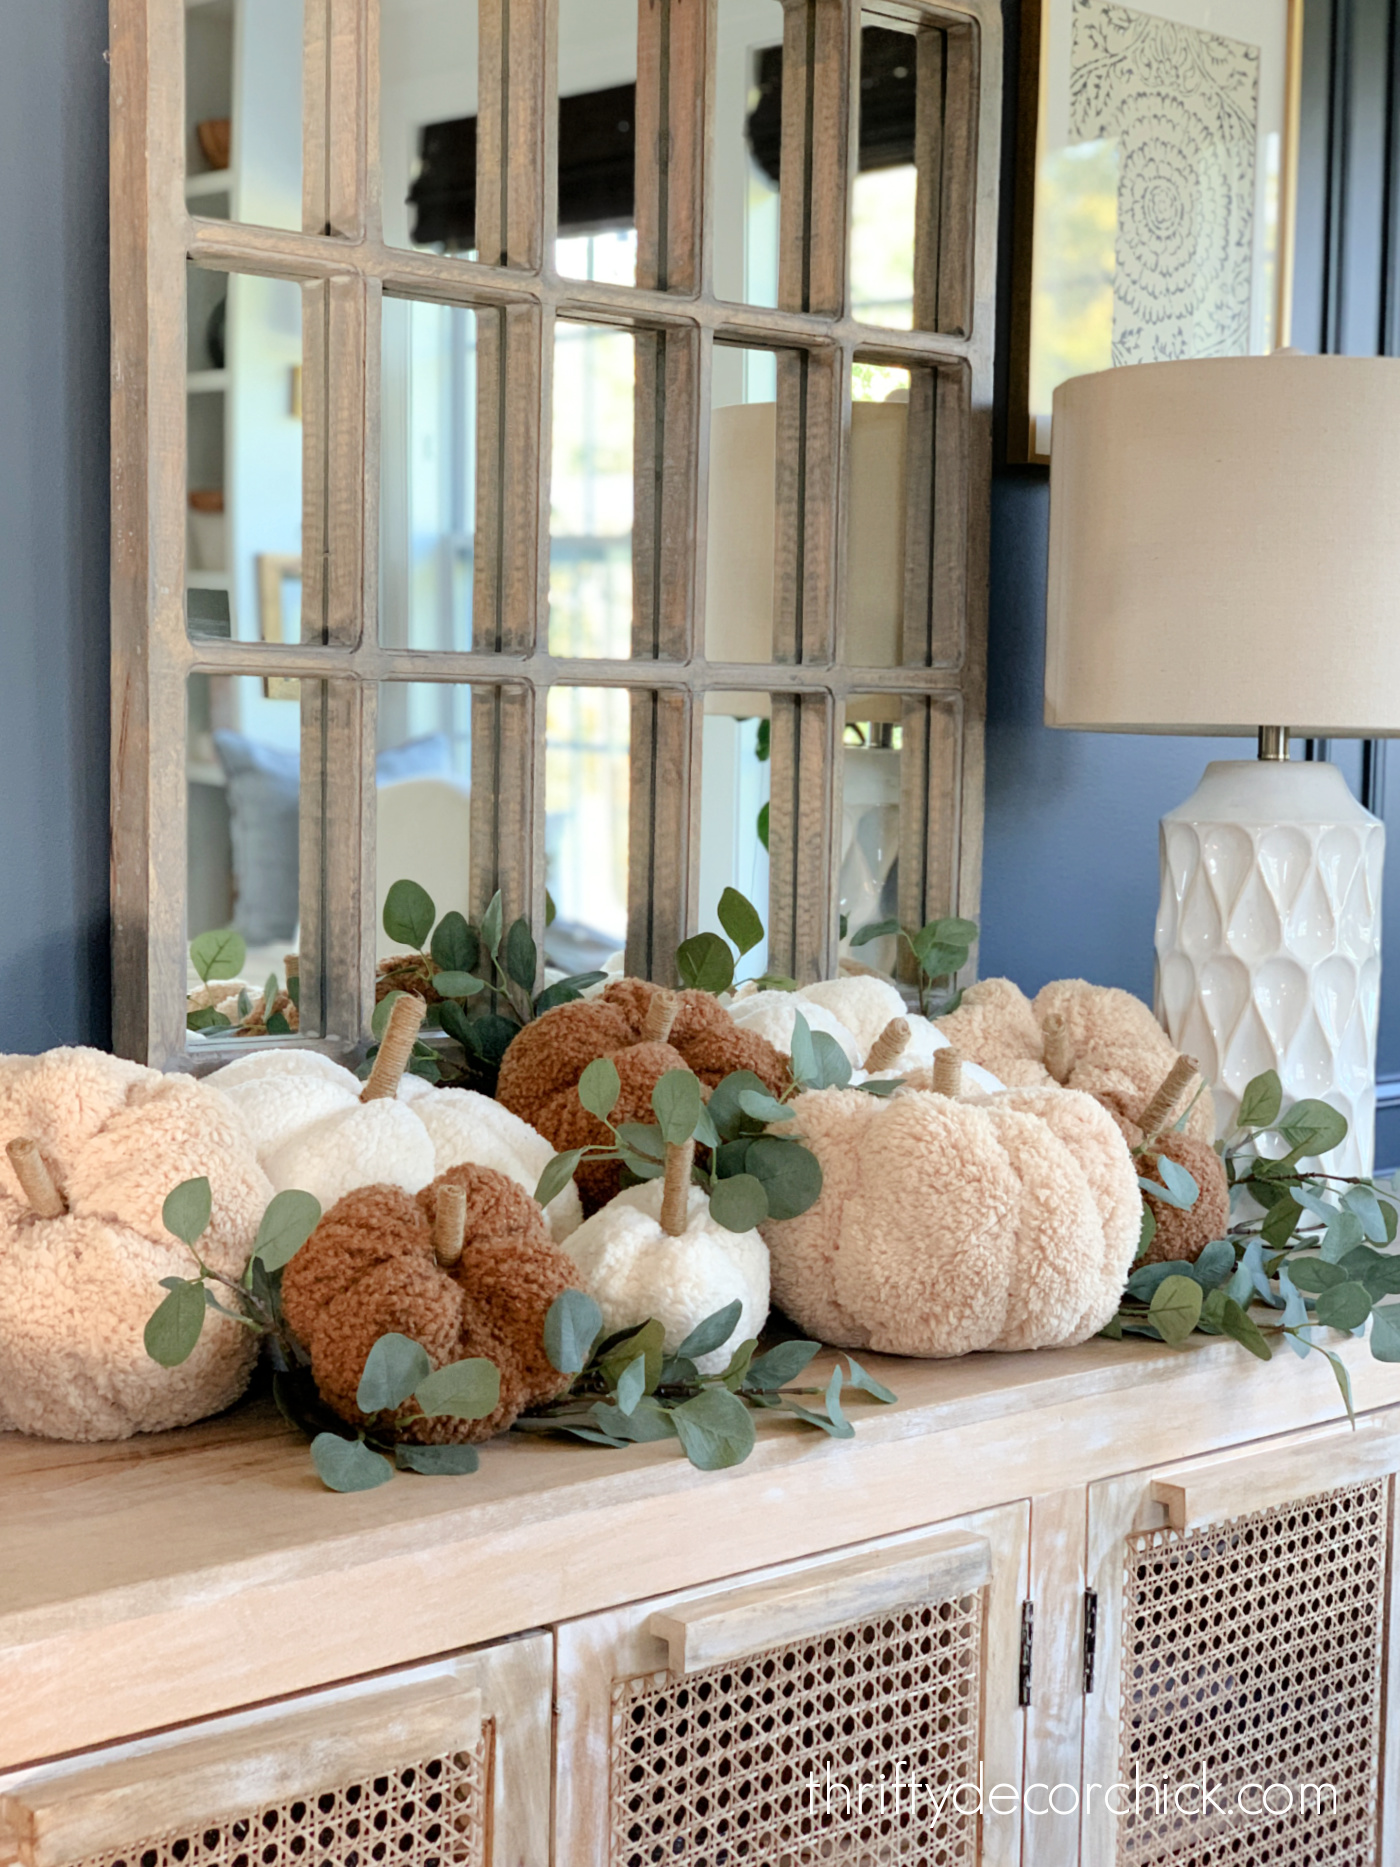
I was setting up to make a few, but I loved these adorable stuffed pumpkin SO a lot, I saved likely. 

They are SO Lovable!:

teddy bear fabric pumpkins

knock off Pottery Barn teddy bear pumpkins

The fabric went a extended way — I bought considerably less than a 50 % of a property in every shade and was equipped to make nine pillows. I even have a small extra material leftover. 

Are not they adoyable?? (As my niece states.):

DIY white, cream and brown fabric pumpkins

DIY fluffy fabric pumpkin decor

DIY soft fabric pumpkins

They are so exceptionally comfortable and I just enjoy them. 

The best aspect? I designed all of mine with $30 worth of cloth and fill — and the smallest Pottery Barn teddy bear pumpkin is $29. 

Soooo I bought nine for the price tag of A person:

soft fabric pumpkin fall decor

No disgrace in acquiring, imagine me…in some cases it truly is the only way to go in my brain. But if you like the appear of these stuffed pumpkins, it is really worthy of trying to make your possess for way much less!

You can’t beat nine for the price of just one! 

This would be this sort of a enjoyment craft undertaking to do with buddies or more mature little ones for a craft evening. 

Test making use of outdated sweaters or blankets to make these as well!

Have you experimented with earning your individual stuffed pumpkins? Can you consider I’ve by no means tried this Do it yourself till now? 

You can pin this tutorial for later making use of this graphic:

How to make fluffy stuffed pumpkins


Source hyperlink

How to decorate for fall {without it screaming FALL} | Thrifty Decor Chick

How to decorate for fall {without it screaming FALL} | Thrifty Decor Chick


How to beautify for drop without having the typical themed decor. 

Five quick strategies to develop a warm and cozy autumn property with these rather equipment! 

Ahhh indeed, it truly is the most excellent time of the calendar year! Perfectly…second most wonderful. Slide has every little thing I adore — amazing temps, the beautiful leaves, all the things apple flavored, and my most loved part…NO BUGS. 

It really is simply the very best. I’m often completely ready to start off warming up our household decor all-around August, but I held off a little bit this calendar year and started off putting some goods out this thirty day period. 

I Like tumble decor — from the cute, themed objects with pumpkins and drop indications, to the far more understated decor with warm, loaded colours and stunning textures. 

In excess of the a long time I have commenced leaning a lot more towards the latter, at minimum for within. For exterior I am nonetheless 100 p.c on the classic fall decor coach. 

I have uncovered some seriously lovely decor that has tons of texture and incorporates the tumble color palette, but does not scream Slide. These effortless little vignettes will warm up your home and make it come to feel beautifully cozy for for the autumn months. 

I am sharing the fundamental principles for non-regular fall decor and I will url to each and every merchandise pictured less than the pictures! 

Baskets or rattan decor 

1st up, I a small tumble vignette for our kitchen area island! 

This post may contain affiliate backlinks for your convenience. 

It will come in a established with three diverse dimensions! I have utilized them all around the dwelling. They are softer than most and will never scratch up your furnishings. 

I assumed the a few stone vases would operate all calendar year spherical…I adore the dot texture on them:


Decorating suggestion: All the things appears to be greater in threes (or odd quantities)

All those beads are from a single of my new favourite outlets on Amazon. They have a TON of magnificent beads in all distinct colors and products. These amber/brown bead strands are a different favored of mine for slide. 

I just about didn’t get the black candle holders/hurricanes (they appear in a set of three as effectively) but I’m happy I did. They are so adaptable and I enjoy the subtle fall search with the leaf layout: 

Aren’t they rather? The medium size matches my Aldi candles properly! (Aldi candles are SO much much less expensive than B&BW!)

I use the two remaining hurricanes in my workplace, together with the smallest tray in the established: 

People wooden beads are an magnificent find too. They will do the job all calendar year round in my decor! 

I am really loving these basket trays — the texture is just what I was hunting for: 

Oh and you can see in the qualifications that I like to use cheap drop scarves as throws on home furniture. They are outsized so can very easily double as a light-weight throw. 

They glimpse terrific thrown on the back again of a chair or sofa, or piled into quite baskets. 

Brass or gold decor

Brass Just about anything works so well in autumn. The warm steel suits proper in with slide decor. I could not pass up these lovable brass squirrels from Goal: 

I want to come across some acorns and lay them in the tray. ) I signify, appear on. How lovable! 

I system to increase a lot more to the mantel, but these men are a very good start off: 

Gold or brass accents are hotter tones that appear good with further slide hues. I constantly pull out my brass candlesticks in the fall, you can expect to see some of those in just a bit. 

Pampas grass 

Pampas grass has made a massive comeback in the previous number of several years! It can be employed in a ton boho design and style decorating, but I feel it appears to be like especially fantastic as a drop accent: 

These tiny very small pampas are so cute! I love them. 

DIY watercolor art from photos

I also observed tall pampas grass that appears fantastic in my tall umbrella holder: 

These include so considerably texture and you can uncover them in a bunch of various shades. 

Wooden accents

Drop filler all around right here normally is made up of very small pumpkins or acorns, but I preferred to check out one thing new this yr. I Like this wood ring filler!: 

It’s so interesting and a terrific option to the classic drop fillers.

I loaded up 1 of my quite wood vessels with them: 

Decorating idea: If you don’t have sufficient filler, use plastic grocery baggage 1st, then fill with your decor. 

The wood rings would appear good in a bowl bordering a candle, or filling tall glass hurricanes. 

By the way, individuals rings are oddly fulfilling…they made a wonderful noise when they bump up against every other. 🙂 My three yr outdated niece spent a excellent 30 minutes stacking, laying and counting them out on the table the other day.

I truly feel like my design and our dwelling is manufactured for slide hues. I really like applying deep accent shades like blue and this lovely environmentally friendly: 
Dark green cabinet with decor

Absolutely everyone needs a excellent wood bowl in their decor, and this 1 is perfect. It’s new but has some character to it: 

I begun observing these wood chains in decor about a yr ago and fell in love with them. BUT you could not obtain them for less than $80 anywhere. It was nuts! 

Now you can uncover them in all kinds of wood finishes for WAY less. I have a wooden toned variation in the basement, but I’m really in appreciate with the black: 

Bowls and trays are good simply because they make practically anything at all glance cohesive. They make for much easier decorating for guaranteed! 

Just plop some things in and it magically appears pulled jointly. 🙂

Pillow addresses in heat hues

Pillow addresses are normally an effortless way to adorn for the seasons — switching them out is one particular my go-to’s: 

Seasonal Pottery Barn pillows for less

I’ve experienced the faux leather-based pillow covers for awhile and Enjoy them so substantially! I employed them in our basement as effectively: 

They have a somewhat much more modern-day vibe, but the distinct texture warms up a room wonderfully. 

Attention-grabbing ornamental filler

The fundamental principles generally search good this time of 12 months — little pumpkins, acorns, pinecones…they all seem good as decorative filler. 

If you might be hunting for one thing distinct this drop, check out fillers with deep colors, like my faux figs: 

Ohhhh I really like them! 

I have had this wooden tray endlessly, but any basket or wooden bowl will do! 

I will not use purple in our property any other time of year, but I have genuinely been drawn to it for tumble currently: 

In the kitchen I love my fake artichokes with their purple and eco-friendly tones:

Of program the glass and wood beads and wood ring filler I shared earlier would appear great as effectively! 

There you go — tumble decor thoughts that aren’t usual but will fill your home with wonderful color and texture this season. 

I nevertheless love my pumpkins and conventional tumble touches (I could do a tiny fall tour soon) but if you might be on the lookout for non conventional slide decor alternatives, these will perform wonderful! 

You can use most of these accessories by way of the calendar year and they will however match in no problem. 🙂

Do you use any non-conventional selections in your seasonal decor? 


Supply website link

Creating a beautiful modern accent wall! | Thrifty Decor Chick

Creating a beautiful modern accent wall! | Thrifty Decor Chick


Costume up a little accent wall with a magnificent sconce, dim wall color and stunning wall trim! 

We have a little accent wall at the bottom of our basement stairs that was contacting out for a very little redo. It can be not much, but is a focal level, as it’s the initially matter you see when you wander down the stairs. 

If you’ve been looking at Thrifty Decor Chick for long, you know our basement has gotten a lot of awareness this yr! 

I have generally identified I was likely to have the dark grey colour about into our stairway landing. When I uncovered the ideal light fixture for that modest accent wall, I understood the time experienced arrive! 

This three light world sconce pulled the complete strategy collectively for me — we liked the modern day vibe but understood that I could continue to make it search cozy in our warm basement: 
three globe brass sconce

This publish could contain affiliate one-way links for your convenience. 

I enjoy how it ties into the world sconces I additional previously mentioned the crafted ins! 

It can be a related brass colour as those people and the remote sconces I added close to the room:

box trim on walls with large map
I could only locate 1 just before photo of this house. I experienced a plug in sconce, artwork, and my secondhand bamboo bookcase entire of decor:

white spindles stained railing stairs

But right after introducing the bookcases on the other facet of the area, it felt like it was too much ideal there. We have lots of places for accessories down there and I required to simplify this place.

We experienced to have electrical energy run for the sconce, which is very straightforward to do if you have essential electrical or wiring expertise. If you have an outlet or switch close by you can insert a sconce with minimum or no drywall fixes.

I Appreciate the light!! SO a great deal: 

Lowe's Ellan three globe light sconce

We set up it flip flopped from the graphic on-line, just to hold the top rated globe absent from minimal arms and/or out of the way if we sit beneath it (see far more in a minute). 

It appeared SO excellent now! But it essential some drama:

analytical gray with globe sconce

So I continued the lovely Westchester Grey (from Sherwin-Williams) all over the corner and it created all the difference! 

I informed my husband the other working day that I pray I in no way want to alter the coloration of our basement partitions and trim…it will be SO Significantly function. 😂 We appreciate this shade however, so it will be a really extended time from now.

I swear each and every time I include this coloration it just feels like a huge, heat hug when we stroll into the space: 

dark gray walls with brass light fixture

A basement or bedroom is a great spot for this deep shade. Grays are unquestionably a much more “cool” coloration, but this a person leans extra heat to me. 

The deep grey created a massive difference but it still necessary a little something. I’ll give you 1 guess on what I extra…trim of system!

I played all around with undertaking some thing diverse on this tiny wall, but in the end decided to go with the simple trim I extra to the rest of the room earlier this calendar year. 

This wood trim is about $8 for an eight foot piece and you can come across it at most big components suppliers. I gave it a coat of semi-gloss Westchester paint, then did a light sanding prior to going onto the second coat: 

dust catching sanding pads

My noticed was content to see me all over again! I have not used it in MONTHS! 

#summerofslothdom 

The cuts are all easy 45 diploma angles, so this is a fantastic rookie project. I put in all of the trim with a nail gun. 

I obtained every little thing up and was SO happy with how it arrived jointly! Our son advised incorporating a bench in this spot, which I imagined was brilliant: 

modern globe sconce with bench
So alternatively, I grabbed the two sq. ottomans that we experienced placed at the ends of our long activity table down below and positioned them there as a substitute:

Westchester Gray accent wall with brass sconce

Best! 

Now they are not getting up house at the conclusion of the desk, but if we need much more seating we can effortlessly grab them.

I’m so quite happy with how this little location arrived together! I just adore that brass complete in opposition to the darkish grey walls: 

dressing up small wall with sconce and paint

That straightforward trim can make these a variance, correct? 

I love how the sconce acts as art. I actually needed to simplify this corner and quiet it down a bit. This labored fantastically!

Of Program I utilised a dimmer swap right here, so this light dims properly and turns into a gorgeous night light-weight. Appreciate it:
dark walls with white ottomans

accent wall with box trim and brass sconce

I have an additional undertaking in the functions for this tiny region that will heat it up even a lot more. Won’t be able to wait around to get started out on that! 

Now that the weather conditions is starting off to change a little bit cooler, we’re investing far more time in this cozy basement. We hibernate down right here all wintertime and I love it!


Have I confident you to gown up your compact walls and hallways yet? They are calling out for some particular attention. 🙂


Supply url

How to change a recessed light to a chandelier | Thrifty Decor Chick

How to change a recessed light to a chandelier | Thrifty Decor Chick


How to swap a recessed can mild with a chandelier or ceiling fan! Change out a can gentle to a light fixture 35 kilos or beneath.  

pinstripe wallpaper hallway by stairs

Both equally of individuals choices are Tremendous easy and consider no electrical knowledge at all!

I do have some electrical expertise, so I considered this next a person would be particularly effortless. While it turns out you you should not want to know a lot other than how to wire a gentle fixture to do this one particular. 

So I believed…simple! 😣

You know how sometimes what you believe will be tremendous challenging flip out to be a breeze, and jobs you assume will be quick convert out to be a lot tougher than you assumed? 

This was a single of individuals tougher than I thought kinds.

I have been doing the job difficult on my closet makeover more than the past pair of months. As I’ve walked through the tiny hallway in our toilet more than and about throughout the process, I’ve thought about some updates I would like to make there as well. 

It is really a modest space, but as you can see above, I love managing spots like that as tiny rooms I can embellish. 🙂 

We have a recessed mild in this location that I realized would look good with a hanging gentle: 

small hallway with marble tile

This publish may perhaps contain affiliate inbound links for your convenience. 

recessed can to light fixture kit

They just have to be 35 pounds or under for this certain package. I bought mine at Lowe’s, but hold in there until the close of the article for a far better solution and how-to movies. 

Do you sense the foreboding? 🙂

Parker brass and white light World Market
I enjoy the brass and white combo and it truly is a good sized mild. I like to go more substantial than you would imagine in modest spaces like this. (This is a fantastic knock off of this beautiful brass fixture with a white shade that is priced Substantially bigger.)

It was on sale and I obtained an extra price cut, so it was $60 off the typical price. I was so excited to get it up — I understood it was likely to look so very good in there! 

This is exactly where the project, that should really just take an hour, turned into four. Four. Hours. 

The can converter just isn’t that tough to install really…it really is essentially just a bracket that you install within the can so a heavier light-weight can be hung. 

But the directions in the kit I utilized have been abysmal. So undesirable that I ultimately stopped seeking to use them and resolved to determine out the install on my possess. 

It just was not doing work for me…the bracket would not continue to be safe. Also, the converter package has a steel medallion that you have to use to deal with the significant recessed hole. But I could not determine out how to set up the light I was utilizing with that medallion. 

I attempted Everything. 

Then…this attractive gentle gave me some suits as nicely. The twine is lined with material, which seems excellent. But if you have to shorten your chain, you can need to minimize this as very well. 

Commonly this would not be a big offer, but the fabric close to the cord quickly commenced unraveling. I tried leaving it by itself but each time I moved the twine the material would fray even additional: 

frayed fabric on electrical cord

It was a Big mess, so I had to thoroughly lower all of that off of the cord, which took for good because I was striving not to nip the genuine wire. 

In between the mild fixture supplying me suits and the kit not doing the job, this venture took way more time than I prepared. 

But I you should not give up! Or I’m just extremely stubborn. Both way, I at last figured out a answer. 

It was as very simple as functioning back to the components retailer for a flat medallion for the ceiling rather of the dome shaped selection they furnished in the converter kit. 

At the time I figured that out, the gentle went up in about 15 minutes…as it should really

Luckily, I appreciate it as significantly as I imagined I would! It is really a seriously lovely mild: 

brass and white lamp shade light fixture

I approach to go fairly extraordinary in this room and this stunning mild is my inspiration. 

NOW I imagine it was really worth all the function. During the cussing, not so substantially. 

Just incorporating a very light fixture adds so a great deal to this smaller house!:

hanging brass light fixture in small hallway

So here’s the thing — this project doesn’t need to have to be as tough as it was for me. It seriously must only be an hour from commence to finish, tops. 

I did some analysis and it turns out THIS can mild converter is Much less difficult to install and has superior recommendations as well. It really is also fifty percent the price of the one particular I received…I purchased two more for a lot less than what I compensated for the a person I made use of. 

I prepare to change out mine with that mounting bracket/converter kit rather. Mine sucked. 🙂

No issue what kit you use, a flat ceiling medallion is a have to. 

If you are impatient and can only find the variation I used at a regional retailer, examine out this valuable YouTube video clip to see how to set up the kit I applied. But do not use that kit. 😂

That is my tale of the lights venture I considered was heading to be straightforward…but wasn’t. Have you tried using changing your recessed can lights with 1 of this kits? How did it operate for you? 

Do you consider I am outrageous for not giving up 3 hrs in, or do you admire my perseverance?


Resource website link

DIY built in Kallax closet hack | Thrifty Decor Chick

DIY built in Kallax closet hack | Thrifty Decor Chick


How to build tons of storage for cumbersome goods in the closet! These cubby units hold a TON and look terrific. 

I have been arranging my closet makeover for some time now…and my designs for the place have adjusted additional instances than I can depend! 

They have continued to transform in real time as I’ve been doing the job on it, but that’s portion of the pleasurable for me. 

Organizing the corporation, in your major closet primarily, is something you definitely don’t want to mess up. It’s a whole lot much more in-depth and costly than a smaller closet. 

Our the latest coat closet makeover encouraged me to get moving on this 1. I was just so exhausted of the consistent litter and mess in my “hers” closet.

We failed to shell out more for melamine or custom shelving when we created our dwelling 4 many years ago — as considerably as I Despise wire shelving, I understood it would just take me awhile to figure out the structure I desired. 

Paying for everything far more felt like a squander of cash at the time. I’m Seriously happy we waited…due to the fact now it’s coming with each other just as I experienced hoped. I will have a spot for Everything. 

I started off my closet redo with this corner. It was the major thorn in my aspect, just due to the fact it was so cluttered: 

This submit may contain affiliate back links for your convenience. 

As you can see, I had a good deal of tall hanging storage readily available. Challenge is, I you should not will need that considerably for dresses and prolonged items. 

Alternatively I utilized it for the a great deal necessary dresser as a substitute — that portion was quite practical. 

I had an plan to create a house base for most of my folded clothes and it is really doing the job wonderfully

To start with up, I necessary to get rid of all of the wire shelving in that corner. 

Enjoyment Moments. You can expect to need a flat edged instrument like a flat screwdriver, as nicely as some thing to pry the hardware off the wall, like a hammer or crow bar: 

how to remove wire shelving

You can require to take these metal pins out very first — really don’t consider to try eliminating the shelving with that still intact! You may end up with giant holes in your partitions. 

After you get them pulled out a bit they appear out extremely conveniently. You can pull them out by hand occasionally as nicely. 

The moment the pin is out, you can get rid of the plastic brackets that keep the wire shelving up:

removing wire shelving hardware

Repeat this 485 times. 

You may be left with Swiss cheese partitions comprehensive of holes: 

empty closet nook

By the way, I never fill each individual hole. If it will be lined forever then I you should not fill them. (Unless of course it is really abnormally big.) 

Subsequent up, I experienced to make certain my new closet units would in good shape right up from the partitions. This is vital to finding a much more customized, created in seem…no matter what area you happen to be performing in. 

I employed my reciprocating saw to slice into the baseboards the place the storage units would stop: 

cutting baseboards with saw

I knew I wanted some bling in right here…that again wall is not enormous so I could do one thing pleasurable. Enter my easy go-to for accent partitions…wallpaper of system! 

metallic pink peel and stick wallpaper

When you purchase wallpaper, make guaranteed you get more than ample of what you’ll require, and seem to ensure that they are the similar large amount number: 

wallpaper lot numbers for matching

Like tile and flooring, diverse whole lot figures can have slight dissimilarities that you may perhaps discover right up from each individual other. 

Then it was time for ALL the storage!! I was motivated by a wall of cubby units that my good friend Carli used in her son’s closet makeover. I shared her challenge with a bunch of other attractive closets right here. 

I was so fired up to get these place collectively…

IKEA Kallax nine unit

I was so enthusiastic, I didn’t even consider a photograph of the progress, but I hung two of these bins on the wall. I say hung, for the reason that you want to make guaranteed and protected them to the partitions with the brackets they present. 

I grabbed some quite rattan baskets from IKEA for the cubbies, but promptly understood they would be terrible…at least with outfits. I adore the seem, but very little bits of the wicker would get into and caught on the garments. 

navy cubby bins from Target

They slide so substantially much easier and are a lot cleaner for the dresses. 

I stuffed most of the 18 cubby units with all of my bulkier dresses that just take up more room, like hoodies and sweaters:

storing bulky sweatshirts in bins

Most I put in the bins, but some I have folded and stacked on the shelves as very well.

I utilized all of this new storage house to arrange my fewer employed garments like seasonal objects — factors like themed Halloween, drop and Xmas clothing. Due to the fact I don’t have a lot of and do not don all those normally, they went to the major of the device. 

I also have some Disney shirts and sweaters I only wear on our trips, so all those went into the leading bins as properly. 

label clips for cubby bins or baskets

I have not labeled them just yet — I want to wait right until I get the complete closet performed. 

I are not able to even inform you how awesome it was to get all of this sorted!:

Kallax closet storage hack with drawers

They are great for minimal items like socks or jewellery: 

Kallax white drawer inserts

I like that I have a few vacant places to operate with. The arranging component is my favorite! 

But where was all of that cumbersome clothes right before it went into the bins you ask? 

Nicely…properly folded and positioned on the wire cabinets of course: 

bulky sweaters and sweatshirts

Ha! Nope. 

Actually, I snapped this photo after I took the hoodies and sweatshirts off the shelf, so it looked way even worse right before. 

This was how most of my folded dresses were being “organized” for the previous 4 decades. It certainly was not doing work! 

Now it can be all completely sorted, organized and very easily accessible: 

Kallax closet storage hack for clothes

I constantly attempt to integrate each variety and perform when working on a area. This very little nook is the great case in point of equally! 

I hope to make just one far more tweak to this place, but IKEA is out of a single of the merchandise I might like to use. I might have to Diy a answer as an alternative. 

This is the just before of this corner once more to remind you of where I began: 

messy closet shoe bins before

Say it with me…no. extra. wire. shelves! What a glorious working day. 😁

Of course that corner was just the beginning…this redo received way more substantial than I prepared. But it is really turning out SO Superior and I are not able to wait to clearly show you extra progress shortly! 

So much I have put in $240 for the Kallax models on this facet of the space. The two cubby models were being $80 every single and the drawer inserts were $20. 

Have you utilized these Kallax units everywhere in your household? They would also do the job wonderful inside of a regular bedroom closet, with hanging rods hooked up on possibly side. 

DIY built in Kallax closet hack | Thrifty Decor Chick


Resource backlink

20 years...never forget

20 years…never forget


I will share this put up each and every calendar year simply because it truly is significant to me that we have a visual reminder of this day, now 20 yrs back. Can you even feel it? 

It is so odd to me that there is a total generation that wasn’t even alive when 9/11 transpired.

As numerous of you know, New York is around and dear to us. It is really a metropolis we appreciate so really considerably. I normally realized I’d appreciate it, and when my spouse took me on my initially excursion (days prior to September 11, 2001) I found out I was suitable. 

I right away fell in like with the town.

This image generally provides me chills. We’re at the prime of the Statue of Liberty and you can hardly see the towers at the rear of me:

20 years...never forget

I feel it was 9 times before 9/11. 9 days later on and the towers were gone.

My partner was a band director at the time — a couple of months following we had been intended to journey to Japan for a band vacation. He canceled that trip and as a substitute we took the youngsters to New York Metropolis. We’ve observed Floor Zero at it really is ideal and worst. New Yorkers stopped us numerous periods and thanked the young ones for traveling to.

These initial images are from the Ground Zero Museum and tell the story of that day. This area is individual from the new museum – it used to be nearer to Ground Zero but it appears like it’s moved to 14th road. If you go to the metropolis I really propose going to both of those.

I let the photographs do the speaking (forgive the top quality, all were being taken with a mobile phone in excess of the decades):
20 years...never forget

 20 years...never forget
 20 years...never forget 
20 years...never forget

20 years...never forget 
20 years...never forget

20 years...never forget 
117_thumb[1]_thumb[5] 
20 years...never forget 
20 years...never forget

20 years...never forget 

20 years...never forget

Ground Zero Museum 
20 years...never forget 
20 years...never forget

The new 9/11 Museum looks so modest from the outside the house, and you believe it will only consider an hour or so get via. Program appropriately because this museum practically goes deep into the Earth and you can spend hrs in there. 
It is just one of the most effectively accomplished museums I’ve at any time visited, in particular looking at the written content. The starting is a tour of the footings and partitions of the towers (this wall under was 1 of the towers). 
Do not skip the home in the center in this component of the museum — it holds photos of each and every of the victims as very well as movie about every single one. There are no cameras allowed in this space — it is most undoubtedly a memorial. 
There is a separate home at the end of the main component of the museum and it can be uncomplicated to skip — but it holds most of the pictures, artifacts and video clips. It may possibly not be ideal for younger youngsters but our (then) 9-yr-old did good. (There are pieces of this place we steered him away from.) There are no cameras permitted in that location as effectively. 
If you go give oneself plenty of time and be ready for the heaviness in your heart you will sense as you stroll via and when you depart. It is overpowering and unavoidable. 
I think every single person that visits New York Metropolis need to take a look at at minimum when. 
20 years...never forget

20 years...never forget

20 years...never forget
This artwork signifies the coloration of the stunning blue sky on that morning. There are 2,983 squares — one for every single man or woman misplaced on September 11th and at the 1993 bombing. 
God bless all those we missing on that working day and their people. God Bless The usa. 

World Trade Center Memorial fountain

World Trade Center Memorial

One World Trade Center
Independence Tower
20 years...never forget

If you have options to go to NYC, be sure to check out out my manual for the will have to-sees on a swift journey. This is specifically helpful if it can be your very first time there. 

Help you saveHelp you save

See additional of our home and shop items in just about every room below.
In no way overlook a article by signing up to get posts by way of email. 


Resource url

How to stop {almost everything} from sliding around | Thrifty Decor Chick

How to stop {almost everything} from sliding around | Thrifty Decor Chick


Quick fixes to avoid (just about anything!) from sliding close to in drawers, on the wall or on the floor! 

I have a matter with issues that do not keep set. Containers sliding all-around in drawers, rugs that will not stay set, images that never stay leaning like they should. 

At the least, it’s just frustrating. At the worst, like with rugs, it can be unsafe!

I have a few methods that have worked SO well for us over the many years. These do the job for objects that lay flat and slide all over, like in a kitchen area drawer, and decorative items that you want to remain where they are on a shelf or leaning versus a wall. 

My very first merchandise is a person I just not too long ago found…

Museum gel/putty to stop sliding

If you reside in an area that is additional vulnerable to earthquakes, you’ve got most likely read of this one particular. 

This article may perhaps contain affiliate inbound links for your convenience. 

I extra a drawer liner considering that would support. Nope. The drawer liner and the bins would continue to slide all around just about every time we pulled out a drawer. 

Then I additional little dabs of incredibly hot glue below the liner wondering that would support. NOPE. That stopped the liner from sliding but the bins did not. 😂

It is not a significant point, clearly. I suggest…this is modest in the plan of lifetime. But it drove me batty

clear museum gel or putty
I received the obvious since of our (primarily) apparent bins for the drawers. It also arrives in a putty coloration as perfectly. 

It really is essentially really awesome — it stages out on it can be possess and is SO distinct, it looks like drinking water: 

clear earthquake gel no sliding

You will need to have to dig some of the gel out and roll it up into smaller sized areas: 

clear museum gel non slide

My lighter bins failed to consider significantly, the even larger kinds need a couple of more or bigger items of this gel.

It is really not super sticky, so you are going to have to do your best to get it below your product mainly because it isn’t going to definitely connect at 1st, at the very least to the plastic bins. Push down and wiggle a bit to make positive the gel sticks effectively.

After it is touching the two surfaces it seriously grabs on. Helloooo…no sliding! I really like it!: 

prevent sliding in drawers

This museum gel is so interesting to me…it will help to protected breakables in parts that encounter earthquakes.

I love the ingenuity!

  • It isn’t oily at all and would not depart marks on your furnishings. 
  • It is really washable and reusable! 
  • It are unable to be employed for vertical goods, as it would just begin to slide down. (More on that answer in a minute!) 
  • What a Excellent thought to protected decor if you have rambunctious cats! If you know you know! ) 
  • I also listen to it is excellent for products in RVs. So intelligent.

We have tender close drawers in the kitchen and loos, but the merchandise within would even now slide again just about every time we applied a drawer. 

This museum gel will work wonderful on smaller/lighter fat things: 

plastic bins for kitchen drawers

And heavier containers like our utensil organizer in the kitchen area:  

wood utensil organizer

Rug grippers for tricky flooring

If you have rugs on any sort of tricky floor, you know the terrifying feeling when you capture just one just ideal and start off sliding. 😂

I used to only use rug pads, but identified more than the a long time that they failed to definitely secure the rugs like I desired. They would nonetheless slide all above, specifically on tile. And individuals pads are not low cost! 

I experimented with this rug tape, and it normally worked properly at the beginning, but would commence to are unsuccessful the longer we experienced it down. 
rug grippers for hard floors

They are the most effective remedy I have uncovered to preserve rugs in position on really hard floors. They are shaped with angled finishes to fit correct into the corner — one on every side. Hold in intellect that you’ll want two for just about every corner if you program to attempt these!

For the reason that they are made for the corners, the rug won’t curl up there, which is normally the most annoying portion. 

Execs and drawbacks of these sticky rug grippers: 

  • These grippers are reusable — you might be meant to be in a position to rinse them and reapply. (We have not completed that but.)
  • If you have to have to clear your rug or the ground beneath, it truly is greatest to remove them bit by bit from the two your rugs and flooring. 
  • These are surely best for tricky flooring like tile, vinyl or hardwoods. I will not believe they would get the job done perfectly on carpet. (Possibly a incredibly small pile.)
  • I have applied them for both equally thick rugs and very slim ones like the household place rug I have pictured below. They operate terrific on both of those!
  • If you clean your rugs generally I will not imagine these would be the ideal alternative, it just is dependent on how normally you would pull them up. (I cleanse our rugs a couple times a calendar year and can do most without having pulling them up.) 

Artwork putty for securing frames and artwork

On the lookout for a vertical option? Our leaning frames on my Diy photo ledges continue to be put just good if they usually are not touched. ) But we’ve had a few tumble when another person runs by or hits the wall.

This alternative is as uncomplicated as the crystal clear gel, but this just one performs on walls instead. I used to use this identical stuff for my posters again in university!

putty to hold wall art

I just place a small dab powering the body and evenly press it into the wall. They won’t budge except if you make them! It can be tremendous simple to remove although. 

This putty is also great to “completely” straighten art that is not going to remain degree. 

When I utilised this on posters a long time back, in some cases it would leave an oily mark on the walls, Now I don’t see that at all. I imagine if there were being heading to be problems with that, it would be on a flat end paint. 

Also, make positive your wall paint has treated right before utilizing this mounting putty!

How to avert sliding couch cushions

stop sliding cushions hack

But it works! And you will not want a massive piece — you can effortlessly slash them to the dimension you want. It is an uncomplicated take care of and instantly retains your cushions from sliding all about. 

Have you tried using any of these methods to retain items from sliding all over? I hope these enable if you are bugged as much as I am by things going close to. 😀 They’re all reasonably priced and only acquire a handful of minutes to implement or put in. 

By the way, in some cases you want things to slide much easier…our rattan baskets applied to scratch up the shelves and designed ins till I commencing to address the bottoms of the baskets: 
cover bottom of rattan baskets

They slide like buttah now. 🙂 

DIY sliding shoe cubby boxes


Resource connection

How our wood counters have held up after 4 years | Thrifty Decor Chick

How our wood counters have held up after 4 years | Thrifty Decor Chick


How our wooden butcher block counter tops have held up over the several years. (And how
to make them glimpse brand name new yet again!) 

It truly is been virtually four yrs since we moved in to this house, can you imagine
it? 

I’ve shared our wood butcher block counters a lot about the many years mainly because I
get SO lots of thoughts about them! I are not able to tell you how frequently I listen to
from readers who are hoping to use wood counters in their kitchen, but a
contractor talks them out of it. 

Several will alert that wood counters are much too hard to keep.

But that’s simply not genuine. Of course, you CAN have wood counters in your kitchen area
and keep them looking terrific!

I promptly went back to my experimented with and genuine wood complete…Tung oil.

This is the matter…no coating will previous without end on wood. Even
polyurethane will wear down with a lot of use.

Ours have been eventually exhibiting some have on. It is been a year and a half considering the fact that I had
recoated the counters with this oil. I try to do it each 6 months, at the most when a calendar year. Even following
all this time, 90 p.c of our island counter even now looked Fantastic!

But we did have some stains in wood: 

This write-up may possibly contain affiliate links for
your convenience. 

They have been all on the counter closest to the fridge, so I am guessing the
stains were from oils from food items.

I ought to mention, I really don’t count on (or want) our butcher block counter to
be pristine. We never reduce immediately on it, but I welcome the
heat of a slightly worn and distressed wooden countertop. 

Somewhat is the crucial phrase. 😁 I’m fine with dings (we really really don’t
have any), scratches (hardly any) and some darker stains. But for the reason that the
finish had worn so substantially, these have been excess apparent. 

Very last time I reoiled the countertops
I didn’t have to sand
— if you do not have any big issues you can find no want to. Just clean up them
effectively and reapply. 
sanding stains off wood counters
I utilized a
fine grit paper (120 grit)
and most of the marks disappeared immediately. There ended up a pair (pictured
above) that were a bit additional stubborn, but I figured the oil would disguise them.
(I was appropriate!)
Considering the fact that I had to sand, I desired to get the fantastic layer of dust off of the
counters initial. A
tack cloth is ideal for this, but if you do not have a single, test to avoid employing a
soaking wet rag to wipe off the dust. The moisture will elevate the wood and
you may drop the smooth end you just attained by sanding. 

At times h2o popping is a excellent thing, but for just sealing counters you
want to stay clear of it. Instead, use a a little bit damp rag to wipe down the
counters. This will preserve the wood from increasing. 

Following sanding and wiping the counters, all you need to do is grab a lint
absolutely free rag and liberally wipe on your Tung oil. I like to pour it immediately on
the counter and then implement: 

how to apply Tung oil to counters

Not like stain and spray paint, you can use a hefty hand with Tung oil. Do not
be afraid to use a whole lot of it! You are going to wipe it down to get rid of the added
anyway. 

Use the light-weight to see where you may well need to have to insert a lot more Tung oil — some spots
in the wooden will soak it up more quickly: 

Tung oil on wood countertops
I’ve utilised all kinds of Tung oil about the several years. My favorite was Formby’s but
they were purchased by Minwax. I have made use of
the Minwax oil
as effectively and like it. This time I made use of
the Watco brand
due to the fact it can be what I experienced on hand. 

Just isn’t it mad how considerably the oil warms up the wooden?: 

how to seal wood counters

Right after permitting it soak in for a little bit — anyplace from 5 to 15 minutes —
you are going to want to get started removing the excessive and buffing the finish with a further
thoroughly clean fabric. 

I’ve uncovered the super economical kitchen area towels from IKEA do the job Excellent! I use
them in the kitchen area and after they are stained they go in the rag pile. 

They are also excellent for staining: 

ikea kitchen towels

If you are oiling a bare countertop for the to start with time, you will want to do
a lot of coats, at least 12 hrs aside. 

As soon as you have accomplished it a handful of moments in excess of many years, one coat will be enough each and every
time: 

Tung oil finish on wood countertops

And it will not acquire practically as extensive to entirely dry!

I oiled our counters to start with detail in the early morning and by evening I was capable to
use the sink no challenge: 

pink green fall hydrangeas in sink

I reduce some of our magnificent hydrangeas and rinsed them in the sink. 😍

They ended up dripping almost everywhere — this is a visual of how effectively Tung oil
shields against drinking water. It beads up and will not soak in: 

how to seal wood counters

I still want to transfer our faucet deal with to the entrance, in excess of the sink. This is
the only spot that I at any time fret about because of the drinking water that drips from
our palms when we transform off the h2o: 

sealing wood counters around faucet

But as you can see, it’s in wonderful shape, even following four decades!

We test to wipe up excessive drinking water throughout the day, but don’t generally
maintain up with it. 

The warmth of wooden countertops is difficult to conquer!: 

That wood all around the sink has also held up fantastically — just make certain to
deal with that section as you do the relaxation of the counters. 


Supply backlink

Easy fixes for a messy coat closet | Thrifty Decor Chick

Easy fixes for a messy coat closet | Thrifty Decor Chick


Basic and handy tips for arranging a messy coat closet. 

Our coat closet has been a mess considering the fact that we moved in (virtually 4 a long time in the past) but I haven’t designed the time to handle this place right up until now. 

It felt appropriate tackling it now with college starting and our typical program beginning yet again. I always crave structure and the relieve of organized areas at this time of 12 months, do not you? 

I was thrilled when Significant Lots questioned me to do the job with them this year! I was so grateful to be able to utilize a several of their organizational items to get this coat closet working very well and looking great.
This place feels like the last frontier as much as organized closets go in our property. Our linen closet appears great and the mud space cat litter and cleaning closet is my beloved ever. 😍 This a single has been a soreness for yrs and I was fired up to get it seeking superior. 

At the rear of this doorway was a catastrophe that I’ve been stuffing matters into for the previous number of months: 

It looks so harmless, until you open up it!

Alright, it’s not Awful. Properly…maybe

We do maintain coats, jackets, boots, beach front towels, pool stuff, more luggage, all that jazz, in below. See how wonderful it appears stuffed onto the leading shelf?: 

coat closet mess on shelf

When I start off decluttering and arranging a house, my to start with phase is to take away as a great deal as I can so I can see what I am working with: 

decluttering coat closet

This post may perhaps contain affiliate inbound links for your convenience. 

organizing towels in sweater bins

They appear with a bracket so you can stack them, but we only desired the two.

I Appreciate these matters and can not wait to use them in my closet someday soon. They would be good for sweaters or sweatshirts!:

sweater stacking bins for towels
Observe how dazzling it is up there? Ahhh these motion sensor LED lights are the remedy to a huge frustration for me. I so wish we would have extra some kind of lights in our closets! 
I trapped the sensor on the door body and then ran the LED strip (it is really sticky on the back again) on the walls all around the trim inside: 

LED motion sensor strip lights in closet

It performs so perfectly — you can established how extensive you want it to stay on. I have ours set to 20 seconds. I acquired a further strip to set in our linen closet as well. 

The rest of the random things was sorted into winter boots and gear, rain things like ponchos for when we journey and umbrellas, and then all the seashore/pool things like sunscreen, seashore toys and water equipment. 

At the time I got every little thing sorted, I realized we wouldn’t will need a ton of storage to get all the things organized. Humorous how when you might be throwing stuff into the prime of the closet it seems to be like a TON. 

I found these white cubby storage units and desired to stack them on the aspect of the closet in the back. When I obtained them assembled and slid a single in, I recognized there wasn’t more than enough area to pull the cubbies out with them on the side. 

SO I experienced an even improved notion — I wished to stack them correct in the middle alternatively. But this wire shelf bracket was in the way: 

wire shelves in coat closet

This was a super effortless resolve! I picked up a new bracket for a few bucks and then mounted them both of those closer to the walls instead of in the middle, so that place was now apparent. 

Perfect!:

Big Lots white storage units

You can see that I didn’t put in the wood toes on the bottom of the major device so I could stack them.

I strategy to exchange the wire shelving with wood sometime…but for now I am functioning with it. 🙂

I drilled two holes into the bottom of the major cubby so I could connect the two collectively: 

Drilling pilot hole

They are built of melamine, which looks terrific and is super simple to cleanse, but they are slick! The top a person would not have been protected without having connecting them. 

The cubby models come with brackets you’ll want to safe into the wall powering so they you should not topple above — specially if you pick to stack them like I did! 

neutral large cubby bins

I truly like the neutral colour and they are Massive! I had to double examine that they would healthy within the cubbies because they are so substantial. 

Colby beloved the new storage, of study course:

Stacking tall cubby storage

We went by means of our coats (I truly feel like we experienced a TON) and got rid of ample that the storage shelves fit completely in the middle without having the coats experience smushed. 

Our coats are hanging in the mud space all wintertime anyway — we seldom require to seize them from listed here. The good component is we now have some space for more coats when men and women come in excess of! 

I don’t imagine we’ve ever been able to dangle our visitor’s coats in our coat closets. ) 

I Adore all of the storage, but we necessary to know what was in each and every bin. It would’ve taken four months of me pulling out a few of the four right before I would bear in mind what was in each and every 1. 

I experienced some oval wood styles from the craft keep in my stash (I was likely to make ornaments with them very last calendar year), so I drilled a hole on each stop and then painted them with chalkboard spray paint: 

Chalkboard spray paint

As an alternative of words like “winter season” and “summer time,” I did a small seasonal art as a substitute.

Soon after I drew all about them with chalk, I recognized I did not want them to wipe off, so I sprayed a crystal clear coat on major of every a single. And the chalk drawings disappeared right right before my eyes. 

Awesome. 

Fortunately I could even now see a shadow of what I drew when the obvious coat dried, so I was able to do it yet again, this time with a white Sharpie marker. 

I held them up and drilled into the cubbies: 

Drilling into fabric cubbies

And then hooked up them with long brads that went by way of the wood label and the cubby: 

Attaching labels to cubby bins

It labored wonderful! 

Now we can see what seasonal gear we are reaching for — winter boots or pool goggles?:

DIY chalkboard labels for coat closet

As my niece would say…adoyable! I like them. 🙂 

The cubbies keep a TON so that was all the storage we essential. 

Other than a couple coats we donated, pretty much every little thing that we began with stayed. I moved a back again pack up to our son’s closet and the massive umbrellas out to our garage wherever we can let them dry immediately after working with them. 

Now this closet is SO beautifully structured and useful…you know how happy this would make me! I appreciate that we even now have plenty of flooring house if wanted:

coat closet cubbies and bins

Once in a while I open up the door just to see the lights and great business. ) 

You know this is the finest portion — the just before and right after: 

messy coat closet before
Organized coat closet cubbies

Ohhh yes…the finest! 

This write-up sponsored by Massive Heaps but all views are my personal. 

I only work with companies and goods I know, appreciate and would suggest to you. 


Resource link