Category Archives: DIY TIPS

Four DELICIOUS & easy Crock-Pot soup recipes


My four absolute favorite comfort food slow cooker meals! They are creamy, delicious and super easy. 
Three of these are creamier, chicken slow cooker soup recipes, and one is a classic CHEESEY mac and cheese. I mean…how can you go wrong? 
I enjoy making these crock pot meals as much in the warmer months as I do in the cooler ones. I call them all “comfort foods” — but that goes any time of the year! 
I’m sharing some of our favorites and a few changes that I make to the original recipes. 

First up – this truly scrumptious slow cooker chicken and dumplings recipe:

Crock Pot Chicken and Dumplings

crock pot chicken and dumplings made with biscuits


This post may contain affiliate links for your convenience. 
See my policies and disclosure page for more information.

I first found this recipe ten years ago (the blog is no longer operating). 

It is SOOOOO good! 
I am a chicken and dumplings NUT. This one does not disappoint and you’ll be surprised at how easy it us. 
Crock pot chicken and dumplings
4-6 boneless skinless chicken breasts 
2 tablespoons butter
2 cans cream of chicken soup
1 can chicken broth
1 onion diced (I used half of one)
1 tablespoon dried parsley
4 grands flaky refrigerator biscuits (add more if you want!)

  1. Put the chicken, butter, cream of chicken, chicken broth, parsley and onions in the crock pot and cook on high for four to six hours. Mine only needed about five. 
  2. As the chicken cooks and gets tender, break it up with a spoon or fork.
  3. Get your biscuits and cut them into nine pieces. I kind of rolled them into balls to ensure they stayed whole but it’s not necessary. Stir into chicken mixture and cook for another 30 minutes to hour. (Watch to see how they are “baking” in the soup. Mine are usually done around 30 minutes.)

If your soup is a bit thick, add chicken broth or chicken soup to your liking.

It is SO delicious!! And so much easier than making your own “dumplings.”
 
This easy slow cooker mac and cheese recipe is another hit!

Crock Pot Easy Mac and Cheese

no stir crock pot macaroni and cheese

Crazy easy slow cooker mac and cheese

1/2 pound elbow macaroni
4 cups finely shredded Cheddar cheese, divided
1 (12 fluid ounce) can evaporated milk
1 1/2 cups milk
1 egg
1 teaspoon salt
1/2 teaspoon ground black pepper
Dash of Worcestershire sauce
  1. Very important before you do anything – spray the crock pot well with cooking spray. Or you can use these slow cooker bags that are safe for high heat. Clean up is a breeze!
  2. Mix the egg, fresh milk, evaporated milk, and Worcestershire together in a large bowl. Mix in the uncooked macaroni and three cups of shredded cheese. Pour into the crock pot and sprinkle the remaining cheese on top. 
  3. Cook on low for four to five hours — check around four because that’s when mine is about ready. Do not stir or remove lid while cooking. 

That whole not stirring thing was so hard for me. I always feel the need to stir. 🙂

The first time I made this I used thicker shredded cheese, but I find finely shredded works better. 
I saved the best for last…this creamy chicken and wild rice soup is fantastic! I first found this recipe here.  

Crock Pot Creamy Chicken and Wild Rice Soup

Creamy crock pot wild rice and chicken soup

Ohhh…I’m drooling just thinking about it. SO. GOOD. 

This one takes a bit more work, but it’s worth it!
Crock pot creamy chicken and wild rice soup

4 cups chicken broth
2 cups water
2 boneless, skinless chicken breasts
1 package of Rice-a-Roni long grain and wild rice
1/2 tsp salt (plus more to taste)
1/2 tsp pepper
3/4 cup all purpose flour
1/2 cup butter
2 cups half and half
1 cup grated carrots
1 cup diced celery
and/or
1 small can mushrooms

  1. Mix the broth, water, carrots, celery, mushrooms, chicken and rice and the rice seasoning packet in the slow cooker
  2. Cook on low for six to eight hours or on high for four hours. I did the high version and it turned out great. 
  3. Once chicken gets tender (couple hours in), break it up into pieces with a fork while cooking. 
best chicken and wild rice soup

At the end of the cooking time, get a small bowl and mix the salt, pepper and flour. 

Next, in a medium saucepan over low heat, melt the butter. Stir in the flour mixture a tablespoon at a time to form a roux. 

A roux is a mixture used as thickener for stews, soups and gravy.


While still on low heat, finish the roux by whisking in the half and half a little at a time until completely smooth:

How to make a roux for soup

Stir this yummy mixture into the soup in the crock pot then let it cook on low for 15 more minutes. 

Then die and go to heaven cause it tastes that good
We like our chicken and wild rice soup thicker, almost like gravy. If you prefer it thinner you can add additional chicken broth. I would wait to see how it cooks up first though. 
Because…come on:
easy slow cooker chicken and wild rice soup
I know many of you have tried this and it’s a favorite of yours as well! 

You can’t go wrong with any of these favorite slow cooker comfort foods. 

Are there any easy crock pot recipes you love? Feel free to share!

Here’s a helpful pinnable image for you to save these recipes for later:

slow cooker chicken and wild rice soup
This creamy chicken and noodle soup is absolutely delicious as well!:
creamy chicken and noodle crock pot soup

See more of our home here. 
To shop items in our home, click here! 
Never miss a post by signing up to get posts via email. 


Source link

10 creative DIY ways to hide the cat litter

10 creative DIY ways to hide the cat litter


Hello there my friends! I experienced this sort of a terrific response to our cat litter remedy a couple
weeks back, I figured I might round up a couple additional fun thoughts for hiding the litter
whilst continue to creating kitty come to feel cozy. 

These are all Do-it-yourself strategies, but I share some keep acquired products that search
wonderful at the end of the publish also.

hide cat litter in closet with cat door

Our vacuum and some other objects are on the right side as very well. 

This has worked out SO perfectly for us and the cats seem to be to really like it! It is really been so
easy to retain the mud area clean now way too. Cat litter appears to be to keep track of in all places
but most of it stays in the closet. 

I know not absolutely everyone has a cleaning closet they can use for the litter so I
gathered some other concepts as well. Most of these Do it yourself cat litter methods
hardly just take up any room and seem Excellent! Click on the connection under just about every image to
get to the tutorial. 

Danae utilized a quite IKEA cupboard to disguise the litter and all of the
equipment: 

ikea cabinet DIY to hide cat litter

Adore this! When it is really shut you’d have no idea what is hiding within. 

Jennifer made use of a facet table to make this adorable cat “cave” for their
kitty!: 

DIY cat litter cave
I like that you could personalize this with a fun paint coloration or fabric. We
did one thing comparable
underneath our outdated folding table
in the laundry and the cats did terrific going via the “curtains.” 

This put up may possibly contain affiliate one-way links for
your convenience. 

Amanda took a thrifted cupboard and turned it into a spot to hide the cat
litter: 

repurpose cabinet for cat litter

What a magnificent kitty! Other than the minimize out on the aspect, no 1 would at any time
know this is hiding cat litter.

I noticed this plan on the internet and while it was so smart! I appreciate how they utilized the
little space below the sink to cover the cat litter: 

hiding cat litter under sink

You can find not a ton of place for significantly down there in any case, so why not make it extra
functional? 

Zoe created a rustic cat litter box that would be a best bench for a
mud home: 

DIY bench to hide kitty litter

I like that the lid lifts up so it truly is effortless to clean. 

Scott reworked this outdated kitchen area island into a wonderful attractive cupboard
that also hides the litter:

hiding cat litter with fabric curtains under table

He shares entire ideas to make your have! So quite a few of us have a cabinet that could
be changed up fairly very easily to accommodate the litter. 

Do you have a doggy that you want to retain out of the cat litter? This
solution is a wonderful alternative due to the fact the prime entry keeps the canine out: 

DIY solution to keep dogs out of litter

I like that this seems to be like a normal cupboard from the front! 

This enjoyment cat apartment was produced by repurposing two finish tables: 

DIY cat litter condo


The cat litter is at the bottom and you will find storage on leading. This pretty piece
fits appropriate into the decor!

And eventually, 1 of my favorites — this total established up is like the penthouse of
cat litter options. I really like every single little bit of it!: 

ultimate DIY cat litter cabinet solution

You have to see all of the facts, which include motion activated exhaust enthusiasts!
SO cool. The techniques and door are super lovable way too. 

So many fantastic concepts that marry equally form and perform. I have discovered our cats
enjoy obtaining a private place to do their business enterprise — just as we do! 😄 Of
study course, if you don’t want to Do-it-yourself this, there are tons of all set-manufactured options as
well. The planter idea joined down below is brilliant! 

Acquire these choices prepared-manufactured: 

Have you discovered a excellent solution that hides the cat litter? 


Supply connection

The new & improved Thrifty Decor Chick!


Welcome to the new look and feel of Thrifty Decor Chick! 
It’s been a long time coming!

The new & improved Thrifty Decor Chick!
I’ve always said it’s a mystery that I’ve been successful at this blogging thing. 
I don’t know coding…at all. I don’t pay great attention to Google when they tell us to change things. I was blissfully unaware of what SEO was for years…and even now that I do, it’s rare that I follow it perfectly. 😬
I just want to work on projects and write about them. 🙂 
The new site went live last week and we’ve been tweaking things here and there since.
Overall the site should load much faster for you, especially on mobile devices. Also, the font is bigger and easier to read on both desktop and mobile…so much better! 
When I was gathering the images for this post I found a blast from the past…has anyone been around since this blog header?:
The new & improved Thrifty Decor Chick!

I started my 14th (!!) year of blogging this past May, and it has been an absolute blast! I’m so incredibly thankful to do what I do. 
Here’s a quick virtual tour of the new site! 
We added a drop down menu at the top, so you can access more information much quicker: 
The new & improved Thrifty Decor Chick!

Home tours for our home and our first house are there with links to projects in every room, as well as a page with all of the paint colors in our home by room: 
The new & improved Thrifty Decor Chick!

The new & improved Thrifty Decor Chick!
Hopefully that will make finding my paint colors easier for you!
You’ll also notice that links in my blog posts are much easier to see now — that’s one of my favorite parts! 

And when you see this pink highlight box, it will be something important on the topic! 

We also added easy access to all DIY projects in one spot: 
The new & improved Thrifty Decor Chick!

I plan to add more categories soon! 
On the side bar, you can see links to my most popular posts. If you scroll down just a bit more, the labels I use to categorize posts are listed together. 
Drop down that menu to see all of the topics I’ve blogged about over the past 13 years. 🙂
If you can’t find what you’re looking for in one of those places, you can use the search bar (click the little magnifying glass) on the right under my header. 
Links to many of items in our home can be found by checking out my Amazon Storefront, or via the photos on my “Shop My Home” page under the SHOP tab: 
The new & improved Thrifty Decor Chick!
And finally, if you’d like to be notified via email when I post, you can get new posts to your email by signing up here. 
Or use your phone to take a photo of this QR code: 

The new & improved Thrifty Decor Chick!
I hope you enjoy the new look and design of Thrifty Decor Chick! 
If there’s something missing, please let me know.
See more of our home here. 
To shop items in our home, click here! 
Never miss a post by signing up to get posts via email. 


Source link

The ultimate laundry room organization!


Well hello! We got out of town for a bit last weekend and it was great to get away for a few days! I was reminded when got home how much I love having our big, beautiful laundry room that I recently made over. 
When we travel it’s so nice to walk right in and empty the dirty clothes right out of the suitcases into the washer and hamper. This room works like a well oiled machine now that I’ve added so much storage! 
I wanted to show you how I’ve organized everything in the new cabinets on this wall:
Laundry mud room combo cabinets
As a reminder, here’s how this spot started — just a table for folding clothes: 
folding table in laundry

This post may contain affiliate links for your convenience. 
See my policies and disclosure page for more information.  
Problem was, that surface was always covered with STUFF. 
We moved the upper cabinets from over the washer and dryer to this corner instead. I keep our laundry items in one cabinet: 

laundry room supply organization

We have extra detergent, our fabric shavers, stain spray, etc. on these shelves. It’s so nice to be able to reach these now! 
On the other side I keep all of the cleaning supplies. These used to be in the new cat closet: 
cleaning supply organization in cabinet

By the way, I used to keep some cleaning supplies in different areas — for example, in an upstairs bathroom or in the basement. I’ve learned if I keep it all in one spot I can keep track of what we need much better.
Because I installed four 18 inch cabinets below, we had 12 drawers to fill and organize. Heaven! 😍 Here’s a look inside a few of them. 
The top drawers are shallow — I organized those with flat drawer bins for charging cords (separated into those for phones and for other rechargeable items) and outlet chargers: 
storing charging cords in drawer
Those plastic drawer bins are my absolute favorite! So easy to stack or store right next to each other. 
And I used these awesome plastic bins with lids for batteries and Command hooks/strips in this drawer: 
storage bins with lids for small stuff
The other top drawers hold random stuff like sunglasses and pens and all of our mail that needs to be sorted. I LOVE having all of the mail out of sight! 
The second and third rows are much deeper. This one is probably my favorite: 
to do drawer in mud room
Is it weird to have a favorite drawer? 🙂
This one holds all the stuff I don’t want to deal with at any given moment. Things I need to return, items that are “to do’s” and little items I’ve picked for a future gift. I LOVE this drawer. 
I put all of our extra office supplies into this one: 
office supply organization drawer
See all that tape? That’s what happens when you don’t keep like items together in your home. When I purged all of our stuff years ago I realized how many rolls of tape we had. 😲 We’ll have tape, rubber bands, and paper clips till the day we die. 
Most of our gift wrap supplies used to hang in the closet, but I condensed it down into this drawer: 
gift wrap supply drawer organization
If you ever have to blow up a bunch of balloons, that electric balloon inflator is AWESOME! It makes it so easy and fast. 
I still have our wrapping paper on the back of the mud room closet door: 
gift wrap storage solution
And finally, the bottom set of drawers holds more utility items like extension cords and remote switches: 
extension cord and utility storage
Most of these are only needed around the holidays, but I wanted easy access year-round.
And our light bulbs are super easy to reach now as well: 
light bulb storage in drawer
No idea why we have so many light bulbs. They seem to multiply. Now that we use mostly LED I may just donate the older ones. 
Adding all of this storage has me one step closer to a place for everything and everything in its place! Some of these items were in the closet in here before now, some were in the garage and some just floated around the house till one of us dealt with them. Ha!
We even have an EMPTY drawer. As we use up some of the extras even more space will open up. It took a few weeks for me to remember which drawer was what — my husband will be opening a few at a time for awhile though. 😂
And of course, I had to have some pretty organization on display as well: 
pretty laundry supply storage with labels
You can read more about that DIY laundry shelf and the pretty waterproof labels can be found here. 

See my favorite plastic storage bins with the lids here and the open, stackable plastic bins as well!

See more of our home here. 
To shop items in our home, click here! 
Never miss a post by signing up to get posts via email. 


Source link

Faux carriage garage door makeover

Faux carriage garage door makeover


I am often wanting for simple exterior updates to make our household stand out from the relaxation. When you stay in suburbia quite a few of the residences can glance
identical — but there are so a lot of techniques to incorporate some character and beauty without having spending a ton of revenue.


This easy garage doorway update does just that! I have done this a couple
situations above the years and I’m normally shocked at how substantially it definitely variations up
the doors.

I beloved our garage doors with their grey and white paint and trim:

But I understood this simple addition would make them even more wonderful.

You can
invest in metal garage door accents that give it a Craftsman or carriage doorway
appear, and they are tremendous easy to set up! Our home has a modern-day Craftsman exterior so I understood they would match in
wonderfully.

I experienced to use components you connect with screws on our doorways: 

Dark gray and white garage doors with trim

This post could contain affiliate inbound links for
your convenience. 

Most of the sets I’ve discovered appear with two handles and four “hinges.” 

At to start with I only had a person set of hinges up on the leading trim, but I later extra
the set at the bottom and it really accomplished the search:

Craftsman garage door metal hardware

If you you should not want to drill into your doorways there are magnetic alternatives that are even
less complicated to set up! I purchased a
set of magnetic garage doorway accents at first but recognized that the trim on our doorways is wooden, not metallic. Oops.

They really don’t interfere with the operation of the doorways at all. Most have a rust resistant coating that retains up terrific outside the house. The established I put on our garage doorways at the past property has been up for 8
decades and have not rusted at all!

Here’s our garage door at the previous household prior to the hardware depth:
updating plain garage door
This is the established I identified for only $10 at the components
store: 
metal garage door hardware
That exterior experienced a cottage look and I knew this would
appear fantastic! At first I was likely to tape them up to see how I preferred
them, but the tape was not holding, so I just drilled
them in. That was tense.

But you should not be fearful! It will be value it! 


They are truly good high quality — great, weighty steel and I favored that the screws came with black heads to match:
DIY carriage door hardware

I just appreciate how these search!: 
DIY carriage door hardware
If you want to keep likely, you can add a different carriage
door element with faux windows on the panels across the prime. I have found persons paint it on, or you can use
these magnetic faux windows. When they are on they really search like authentic home windows!

It is not a large transform, but on a avenue of basic garage doorways, yours
will stand out!
easy exterior update with carriage door hardware
I really like a straightforward and cheap update! Have you experimented with transforming up
a little something on your garage door? Additional components or painted it? Anybody tried
people fake windows? Do inform!

There are a ton of magnetic
options! This a person is only $12 and this
magnetic components is $17.

This Do-it-yourself landscape lights tutorial is one more exterior update that will
make your house search way more expensive!: 

DIY landscape lighting tutorial


Supply url

How to update old recessed lights to LED


A tutorial on how to easily change your energy sucking recessed lights with LED versions!

I’ve been working on this lighting project (that has already saved us a ton of money!) slow but sure since early this year. It makes a BIG difference in both how your rooms look and your electrical bill!
When we were having some electrical work done for the new basement built ins, the electrician noted how many recessed lights we have in the basement — a ton! He recommended looking into replacing the standard can lights with an LED version that would save a us a lot of money. 
He told us it was easy to change them out, so I started doing some research. It’s a quick change and you don’t need any electrical experience! Turning off your lights at the breaker is all the electrical knowledge you’ll need.
Even though we have plenty of light down in the basement, my photos were usually dark. You can see how grainy the wall and ceiling are in this “before” photo I took: 
westchester gray before
While I worked on that build I started changing out the lights as well — what a difference!: 
huge DIY entertainment wall with cabinets
This post may contain affiliate links for your convenience. 
See my policies and disclosure page for more information.  
I found my LED lights at Lowe’s, but you can find them at any hardware store or online. I’ll share links for a few versions at the end of the post:

LED recessed lights save money
You’ll want to look for this specific version that has the base that you screw in like a light bulb. Any other version takes electrical know how and isn’t really necessary. 
We loved that you can change the warmth of the lights with these: 
Adjustable light color LED can lights
You have to pick what warmth you want before installing, but it’s very easy to change them to a different “color” after they are in the ceiling. 
Before you start, if you have the adjustable option, decide on the warmth you want first. Well, you may want to install one and see how it looks to decide. But after picking, I highly recommend going through the lights before installation and moving them to the right spot. Otherwise you’ll forget and turn them all on and only one will be right. Speaking from experience. 😉
adjustable warmth led can lights
Soft white is the most “yellow” or warmest version, and the least bright. Cool daylight is a more white look and much brighter. Daylight or cool daylight are what I prefer for bathrooms or spaces without natural light. 
Mine came with a bracket that didn’t work for our fixtures, so I had to remove them: 
how to change to led can lights
And replace them with the wire clips that come with the lights: 
change to led recessed lights
See how I have the clips pulled all the way out? Our ceiling holes are six inches. For five inches you want to install them closer to the fixture. Smaller options are available as well. 
That’s the only prep to get them ready for installation! To replace your old fixtures, first TURN OFF THE POWER at the breaker box. This process is almost as easy as replacing a light bulb, but you will be up inside the fixture where there are wires. Always better safe than sorry. 
Remove the light bulb and then just pull down on the metal trim: 
how to change to led recessed lights
Grab the metal clips and squeeze to remove them from the ceiling fixture: 
how to remove recessed light fixtures
Then grab the part where the bulb screws in and squeeze the two metal brackets on the side to remove it from the metal can: 
easily replace old recessed lights
Now you’re ready to install the new one! 
Take your LED light and screw it in like a light bulb: 
how to install new LED can lights
Grab the metal clips and squeeze them into the brackets inside the ceiling fixture: 
replace can lights to save money

How to update old recessed lights to LED
Make sure the wires are tucked in above the fixture and then push it up into the ceiling. That’s it!
Attaching the new light with the metal clips is the hardest part, and even that isn’t bad. I found it helpful to wear rubber garden gloves when I was installing a bunch of cans at a time. 
These lights aren’t just money savers, they look much better (in my opinion) than the standard recessed trim kit. The new ones don’t create a dark hole in the ceiling when the lights are off: 
How to update old recessed lights to LED
You can get LED can lights that are completely flush with the ceiling as well. 
I’ve replaced all but a couple recessed lights in our house — and it was a lot! But once you get the hang of it, it only takes a couple minutes each. 
I finished up our loft this week. It’s hard to capture the huge difference in photos, especially if you are keeping the warmth at a softer level like the originals. 
The LED versions have 70 more lumens than the incandescent bulbs we had before. So at the very least, even at the warmest light, they are still brighter! Here’s the before: 
small upstairs loft layout
And here’s the after!:
the difference LED bulbs make
I used the warm white setting and it’s much brighter and way less yellow! 
I’ve talked about changing your bulbs to cooler tones in some rooms for years now. The slightly cooler lights take all of the yellow out of the space and let you see the real colors in the room!
Here’s another view before:
small upstairs loft furniture
And after — see how the lights wash the walls with more light?:
brighter cooler led lights
You can’t beat it — brighter, cleaner light for less money!
  • In general, I prefer the warmer tones in living spaces and bedrooms. But in rooms with no windows or very little (like a basement) I always go with the cooler lights. Bathrooms are the perfect place for daylight or cooler bulbs — you’ll see what your makeup TRULY looks like!
  • Depending on how many bulbs and what warmth you use, you may want to consider adding a dimmer switch as well. If you go with a cooler tone it can be really bright!
  • The metal trim on the standard recessed lights tends to yellow over time. I’ve heard that’s due to the high heat from recessed bulbs. LED bulbs will cool down rooms with can lights, especially if you use halogen bulbs before!
  • Overall these save a ton of money — our electrical bill dropped by $70 and I’m not even done replacing them all. We’ll make up the cost of the new fixtures in just a few months! 
Have you changed out your old recessed can lights with brighter, energy saving LED versions? I’ve finally embraced the LED — I used to hoard incandescent bulbs. 😂 Now I appreciate how far the LED options have come!
Here are a few LED can light options. You’ll save money by buying a set:
  • The same set we used with adjustable warmth
  • Our version in the 2700K warm light
  • These are adjustable and the set of 12 comes to only $5 each!
  • This set of 12 can be purchased an any warmth 
  • Set of four LED lights (pick your warmth)
Read more about replacing incandescent bulbs with daylight versions here: 
comparing incandescent and daylight bulbs
Did you know you can easily change out a recessed light to hang a pendant?: 
blue and white wallpaper in hallway white door

See more of our home here. 
To shop items in our home, click here! 
Never miss a post by signing up to get posts via email. 


Source link

Colorful master bedroom refresh


Hello my friends! I’ve always said paint is the number one way to make a big impact in a room for the least amount of money, but fabric or textiles are a very close second. Drapes, bedding and rugs can add color or texture and will go a long way to making a room look a lot different. 
My latest addition to our bedroom did just that! Last summer I added some finishing touches to our master that really lightened it up, but still left it feeling super cozy: 
master with gray walls blue white accents
This post may contain affiliate links for your convenience. 
See my policies and disclosure page for more information.

We love the dark gray walls combined with the lighter grasscloth wallpaper — it’s such a cozy space!
The bedding helped to lighten things up, but lately I’ve been craving some more color in here. Plus, even though we don’t wear shoes in the house much, the rug got dirty so easily. 
I knew pink or coral tones would look so good with the darker accents in here, so I did some looking around online and found this colorful option (the Loloi Skye in sea/rust) that looked perfect:
Loloi skye rug in sea/rust
But I kept hesitating — it was a lot of color for me! I kept going back to it over and over though. 
This is the same brand as our family room rug. Loloi is a higher end brand and usually expensive, but these are from their Loloi II line and are much less. There’s a reason they’re so inexpensive, and I’ll touch on that in just a bit. 
After going back to this one over and over, I finally ordered it late last year. When it was delivered it was even more colorful in person…and I hesitated again. 😂 It sat wrapped up for a couple weeks before I rolled it out. 
Thankfully I absolutely LOVED it once it was unrolled in the room. The design, the colors, it’s all so lovely: 
dark blue vintage navy rug with accent colors
You can see it’s definitely more vibrant in person.
The one caveat with this rug is that it doesn’t have any fibers or texture like a traditional rug. It’s really just printed, kind of like a mat: 
Loloi II skye rug sea rust
I wasn’t sure how I felt about that at first, but once we got it down I REALLY loved it. You have to get really close to it to see that it’s not a woven rug. 
It’s really not much different than the rug we have in the family room: 
Layla rug white sofa family room

I didn’t notice it as much with that one for some reason.

So far it wears as well or better than a regular rug:
colorful loloi rug blue coral
I got the 7×9 size and it was a bit smaller than our last one. Turns out it’s the perfect size for our bed (king sized) and the room: 
dark tray ceiling with wood beams
See how we added those wood “beams” here!

The rug itself is soft, but thin. It doesn’t feel thick underfoot like a regular one. A rug pad would help that a lot! We don’t mind that it’s not cushy. 
It hides everything though, and has held up really well. We have one of these rugs in our kitchen and I’ve even thrown it in the washer to clean it! 😮 I wouldn’t recommend doing that often, but it held up great!
There are a TON of different colorways and designs available — from more neutral to colorful. 
You can shop this room by clicking on any of the photos below: 
!function(w,i,d,g,e,t)d.getElementById(i)(window,”shopthepost-script”,document,”__stp”,”/js/shopthepost.js”,”script”)

Colorful master bedroom refreshJavaScript is currently disabled in this browser. Reactivate it to view this content.


See more of our home here. 
To shop items in our home, click here! 
Never miss a post by signing up to get posts via email. 


Source link

How to Paint Your Kitchen Cabinets Tutorial


A detailed tutorial on how to paint your kitchen cabinets.

If you’ve ever considered painting your kitchen or bathroom cabinets, this tutorial will take you through every step! This particular process uses a paint sprayer, which will give you the absolute best, factory-looking finish. 
If you’re interested in painting your cabinets by hand, check out this cabinet painting by hand tutorial. 
This post has been updated to share with you again! 

I told you about my new love affair with the best paint sprayer I’ve used — if you are considering this project I HIGHLY recommend it. It will get the job done well.

This is the entire cabinet painting process, step by step to break it down for you. Painting your cabinets is NOT hard. It’s a practice in patience and it can be stressful at times, but it’s not hard. 🙂 

I have to first thank my friend Jenny from Evolution of Style again — she traveled over from Cincinnati to help me get set up and go through the process with me. She is a pro at this and her advice was SO helpful! 
Check out her site to see her kitchen redo as well:

how to paint kitchen cabinets
This post may contain affiliate links for your convenience. 
See my policies and disclosure page for more information. 

OK here we go!

Prepping your cabinets for paint

1. Remove and label all of your drawer and cabinet fronts. 

Keep track of your screws and hardware in separate baggies — and label the bags well! I had bags for door screws, drawer screws, hinges and then one for random stuff like our tip out trays and the lazy Susan cabinet doors. 
If there is something you’ll need to remember how to put back together, take a photo of it before you take it apart. I did that with our tip out tray doors and it helped a ton:

tip out drawers

Number your cabinets doors when you take them off — use painters tape and a sharpie and write the number of the cabinet on the tape. This will eliminate the guessing game of where they go back when you are done!

2. Wipe down your cabinets with a wet rag, then sand lightly. I used a 220 grit sanding sponge:

how to paint kitchen cabinets

I recommend wiping them down first. If there’s crud on them, sometimes that just gums up the sanding block. It’s best to clean them a bit first and then sand. 

You don’t have to go crazy with sanding — more on that in a minute. But you just need to get a little bit of the shine off the cabinets. I didn’t sand much, just a quick pass over the fronts.

3. After sanding you need to clean them well. 

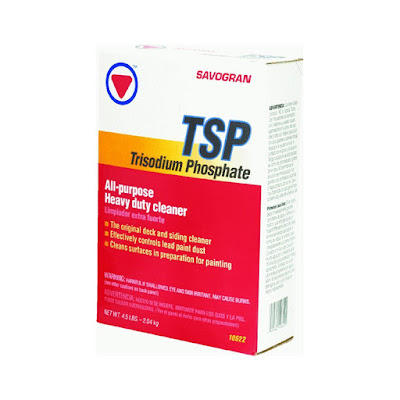
The BEST product I’ve found that I’ve used over the years is TSP:

best cleaner before painting kitchen cabinets
I used it in a spray bottle already mixed but I can’t find that anymore. This mix works as well. Spray it on, wipe it off and then do another wipe with a clean, wet rag to make sure all of it is removed. 
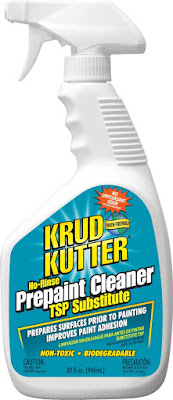
There are TSP substitutes, like this Krud Kutter that is good stuff too: 

cleaner before painting
I really like that the spray version is already mixed up. But if you can’t find the TSP spray, this is a good option. 
Here’s the thing — you really do need to sand a little bit. But in my experience the MOST important step is cleaning really well. Paint will not stick to goo. 🙂 And if it does it will wipe off with the goo later. 

Cleaning is by far the most important step.

It’s time to prime! 

After wiping down your cabinets well and letting them dry, it’s time to prime. 
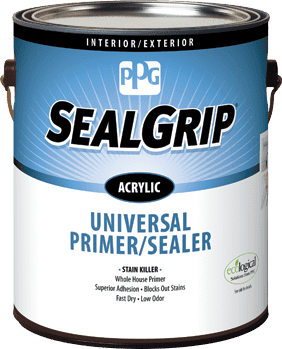
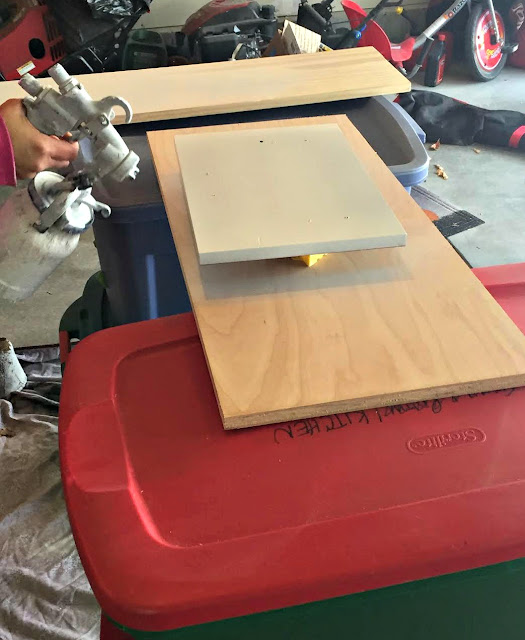
This is where the paint sprayer comes in. Jenny recommended this primer from Porter Paints so that’s what we used: 
best primer for kitchen cabinets
This part went incredibly fast. 
We did one coat on the backs, waited an hour for them to dry (actually a bit longer but you can after an hour) and then we flipped them and did the fronts. I could not start the topcoat (the paint color) for another 24 hours to ensure they cured well. 
This is when you start to see your vision come to light!: 
drying rack for kitchen cabinet doors
And it’s very exciting! (More on that drying rack in a minute.)
**Please be sure to check out my post about the paint sprayer I used here. I share all of the nitty gritty details and tips on actually spraying the cabinet fronts there. 
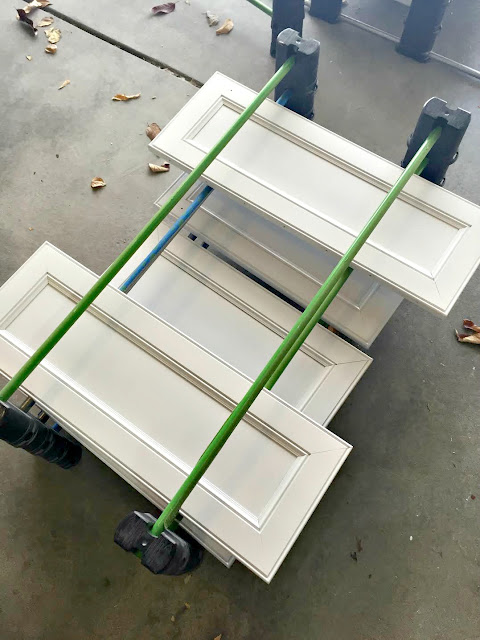
Here’s our set up — my sawhorses fell apart and I don’t have new ones yet (two sawhorses would be ideal) so I dragged out two sets of Christmas bins. 
We set a board across the top and then placed the cabinets on there: 
painting kitchen cabinets
I mentioned in my post about the sprayer that you’ll want to be able to walk around your set up while painting. Give yourself plenty of room! 
I later added a tarp so the bins wouldn’t get paint on them. The spraying process goes incredibly fast! Jenny did the priming with her gun (she does this professionally now and has a very nice spray gun) and she finished up each side in about 30-40 minutes. 
That’s 23 cabinet doors and drawer fronts! 
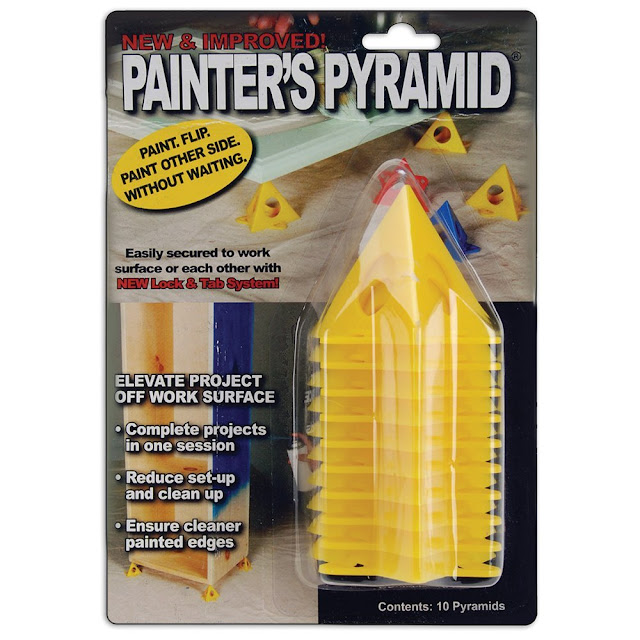
You definitely want to get these painter pyramid supports to get your cabinets up off the board: 
painting pyramids
That way you can get them higher so you can spray the sides of each door. I’ve used these for various projects over the years and they’re handy to have. 
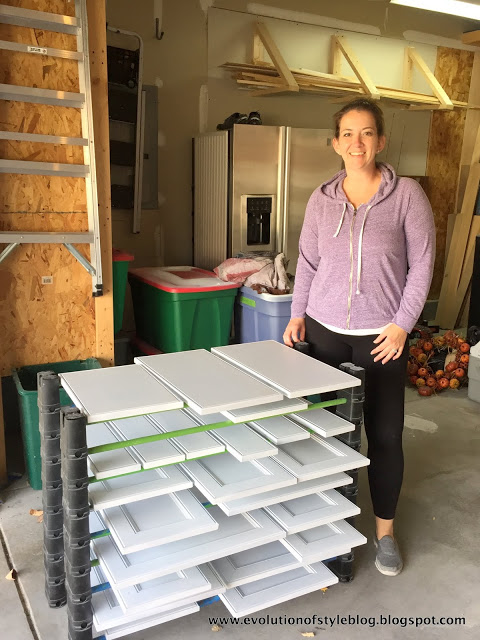
So…that drying rack. I’ll tell you what — this thing made a HUGE difference!! Jenny graciously let me borrow it and I am SO thankful to her. I can’t express how nice it was to have this thing! 
Hers is an Erecta Rack and you place the wet cabinets on there and stack up the railings as you go: 
drying rack for cabinet doors
We would not have parked in our garage for two weeks without it. It also was nice because it kept out of the way — I feel like it protected the drying cabinets from dust better than if they were just laying all over the floor. It also helps them to dry faster as well. 
You can absolutely still paint your cabinets without this drying rack, it just makes the drying process easier. If I didn’t have it I’d use boards to lay the doors and stack them. You’ll want something to let the air flow through a little bit. 

Painting your cabinets 

After 24 hours you can start your topcoat (your paint color). 
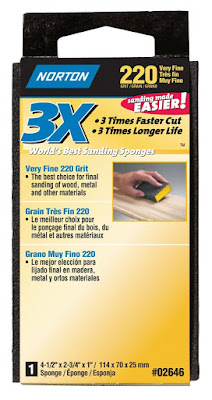
First you’ll want to give the cabinets a very light sanding if they have any imperfections. I didn’t go crazy with this — I’d run my hand over them and if I felt anything I’d sand it down lightly. 
Do this between all your coats! Fuzz and small debris are sure to get in there at some point and sanding them down will get rid of that. 
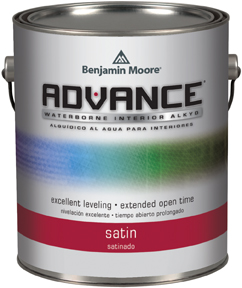
For the paint, Jenny recommended Advance by Benjamin Moore: 
Advance paint for kitchen cabinets
I’ve heard of this for years but had never tried it. A friend used it in their house years ago and didn’t love it, so avoided trying it. Now I understand in some applications it’s not great and I’ll go into that more in a minute. 
I used the satin finish and it is much glossier than I expected for satin — it’s perfect! 

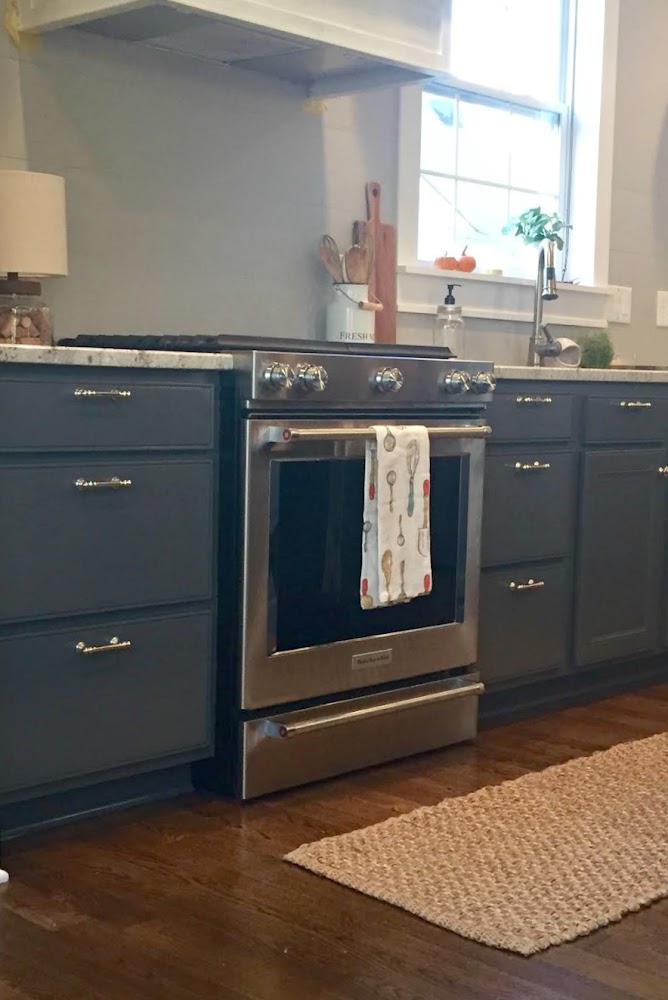
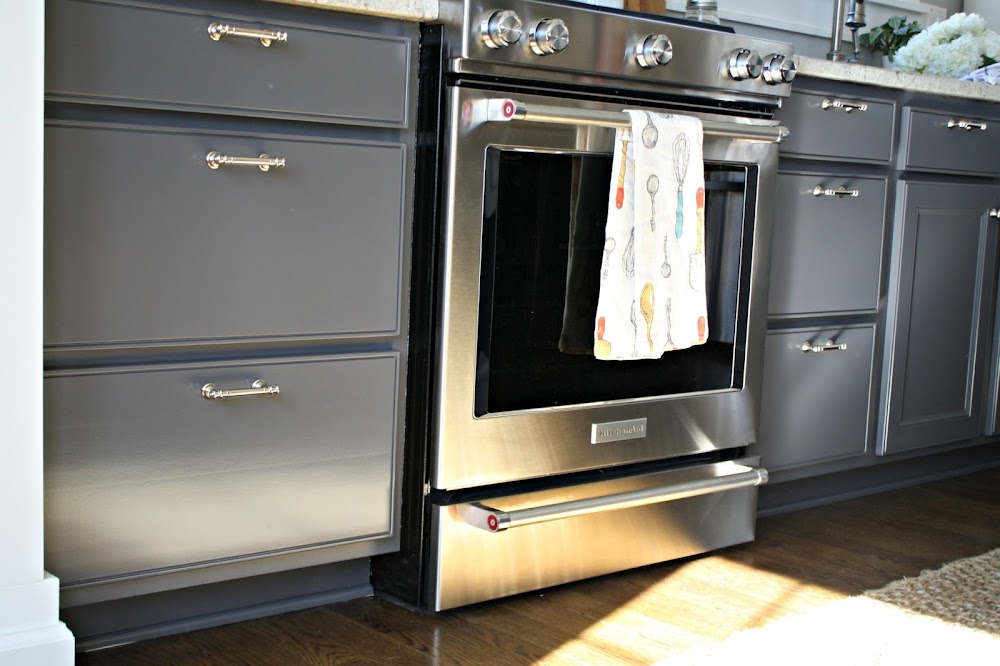
The lower cabinets were mixed in Sherwin-Williams Peppercorn, the uppers in Pure White

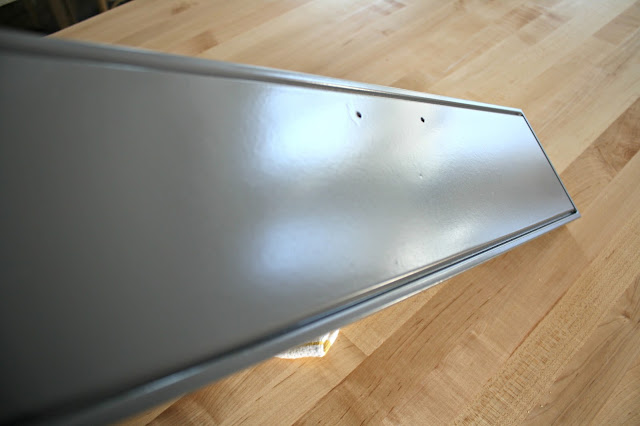
This paint is crazy good when using a sprayer. The finish is fantastic!: 
paint sprayer finish on cabinets
Things to remember about this paint — it can go on thick and will look bumpy when it’s applied with a sprayer, but just hang in there! 
Your weather will affect this and drying time — I had a bit of a freak out moment and texted Jenny the first night because they were taking forever to dry. Usually within a few minutes you can see some parts starting to dry and that first coat didn’t start to lose the glossy wet finish for hours. 
It was raining that night and I knew that would play a part in it, but it just looked thicker and wetter than paint I’ve used before. 
This paint is pretty amazing at self-leveling, so it takes a long time to dry. It should be dry to the touch by six hours but you can’t recoat for 16 hours. Because of the weather I started waiting even longer between coats to be safe. 
Since we were doing a two toned look on the cabinets in dark gray and white, I could paint one color one day, then the next day do the other. This gave them a couple days to cure each time. 

When the rain stopped the dry time got much shorter, but it’s never a bad idea to let them dry a little longer if you can. 

Another tip from Jenny that I didn’t think of — start on the backs. This lets you get the kinks out with your sprayer and get used to using it. This is a REALLY good idea if you’ve never used a sprayer before. 
Sand lightly between each coat of paint and then spray again. Jenny recommended one coat of primer and two coats of paint on both sides of the cabinet fronts. 
I cheated a bit on the backs — I only did one coat. It covered so well I didn’t need to do more. Considering I never even paint the backs of my cabinets I was impressed I even did that. Ha!

Painting the cabinet frames

The frames of your cabinets are a very similar prep process but I have some additional advice to offer here. You’ll want to clean and sand them like you do the doors — I noticed that our frames were dirtier than the doors. I guess I don’t clean those as much?
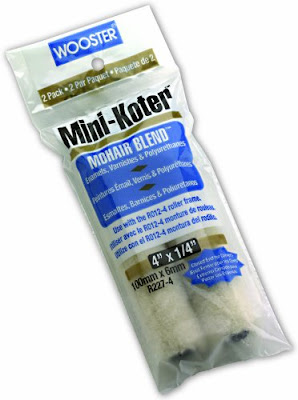
Jenny recommends this mohair roller for larger areas like the side of the fridge:
rollers for painting kitchen cabinets

They worked great! I usually use foam rollers but I quite liked these and the finish. 
Here’s where I wasn’t thrilled with Advance paint — I used a brush to apply it to the upper frames (those were the first ones I painted) and I didn’t like the finish at all
It was crazy because for as long as it takes this paint to dry on the doors, it was drying super fast inside and was hard to work with. I also didn’t like the finish on the frames — you could see the brush marks very easily, even with sanding in between. 
It’s just the nature of the paint. What should have taken two coats of white took three and honestly I could have done a fourth. 
In the end no one will even notice it. Because I did the last couple of coats with a roller that helped a bunch. 
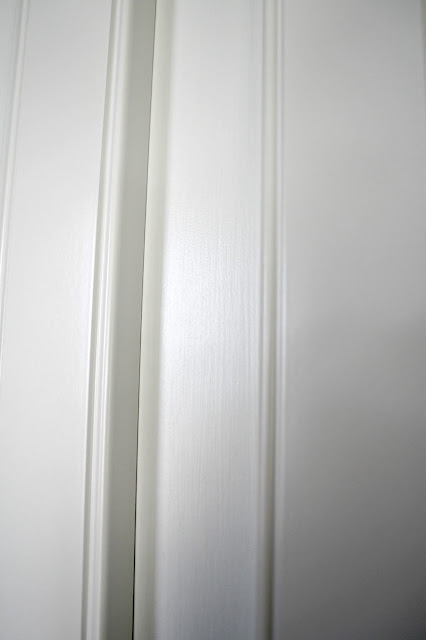
Here’s the frame in the middle and the sprayed cabinets on the side: 
painting kitchen cabinets tutorial
See the brush marks? 
I ended up using the mohair rollers on the bottom frames and that finish is SO MUCH BETTER. So smooth. I used a brush for corners and hard to reach spots and then rolled over it as much as possible. 
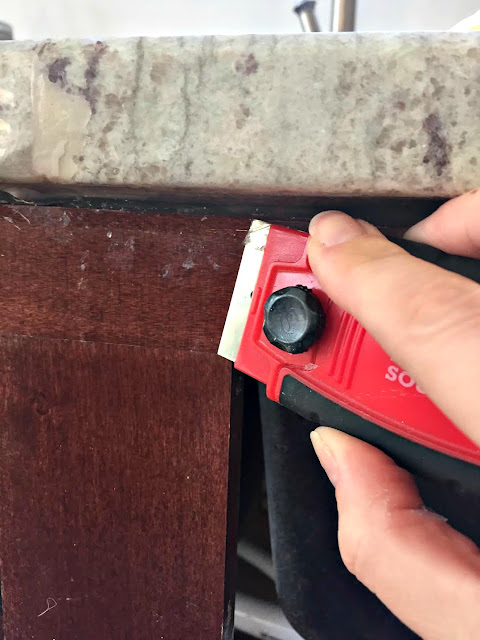
One issue I ran into along the lower frames was the silicone the granite folks added during installation. I put the painting of the cabinets at the end of my list so that they wouldn’t get messed up during the install of the other parts of the room. 

If you do the same, ask your granite installers to hold off on the silicone underneath and you can do it after you paint. 

They really piled it on ours and some of it was so low on the cabinets I had to remove it, which is a total pain in the butt: 
removing silicone
I gave up on the stuff higher under the counters. Thankfully our lowers are dark so you can’t see it well. If you are going from dark cabinets to light all over and are having granite installed, be sure to remember this! 
I tackled the doors first and the frames second — I first thought I should have flipped that. The doors were sitting done and I had to wait days while I painted the frames. Now…I actually would recommend the order I did it — it gave the doors a chance to sit and cure for awhile while everything inside dried. 
This paint (any paint really) takes a good month to REALLY cure well. That means it’s not super hard till then. Some say even two months. I put our new hardware on the cabinets but didn’t screw them in all the way — I’ll wait for another few weeks to do that. 

I thought the process would take me a week, but it would be difficult for one person to get it done that fast with the dry time needed. 

It ended up taking about 12 days and I finished installing the cabinets on the 13th day. The cabinets had cured for about five days at that point, the frames a few days less. 
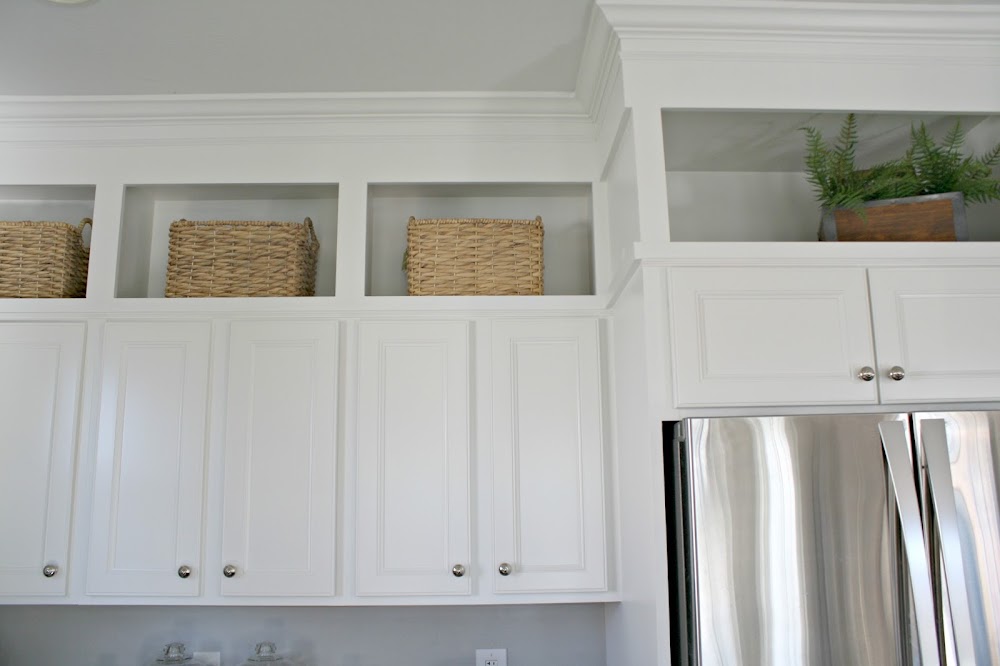
For now I’ll leave you with a couple shots — first of the uppers:
how to paint kitchen cabinets
I know it can be hard to see my vision, especially when they were two-toned for so long: 
building cabinets to ceiling
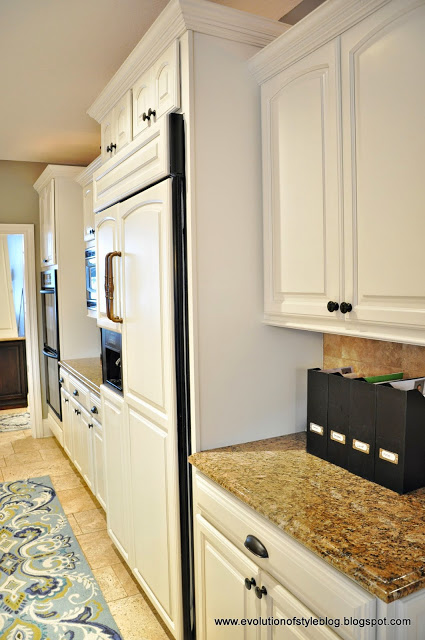
WOW! I love the white uppers!! I nearly cried when I put them up, not kidding. They are so beautiful and it was so thrilling to see what was in my head all this time come to life. 
I love the white but I have to tell you I think I love the dark gray lowers even more: 
two toned cabinets dark gray
I’m a contrast girl and they are absolutely stunning with our floors and with our light countertops. 
Here’s another pic that shows the sheen a little better: 
peppercorn paint cabinets
I have a lot of touch ups to do by the stove and on the quarter round — it’s never ending. 🙂 
I hope you found this helpful if you are interested in painting your cabinets! Remember if you have a grain on your cabinets they will not be quite as smooth. Sanding well before and between coats will help to reduce the grain but it’s hard to eliminate it. 
Oh and I’ve been asked a ton about a protective coat. No, you don’t need to add one. I’ve painted many pieces of furniture and cabinets and if you use a good paint you will not need to do that. If you want to add one keep in mind if you are painting your cabinets white you need to use a water based poly so it doesn’t yellow down the road. 
See the full kitchen renovation reveal here! 
See more of our home here. 
To shop items in our home, click here! 
Never miss a post by signing up to get posts via email. 


Source link

How to add a light anywhere without electricity


This post is all about adding lighting…where you didn’t think you could! I used this easy hack on my wall of office built ins. 

If you remember, in our old house it took me forEVER to find the lights I wanted. I finally went with outdoor lights because everything else was crazy expensive:

DIY built ins with lights above
They worked perfectly! 
Thankfully now that sconces have become more popular, they are much more affordable. There are a ton more options now too. 
This post may contain affiliate links for your convenience. 
See my policies and disclosure page for more information.  
I wanted that look again, and found a brass and black sconce I love that I’ve used before — you can see it here in our mud/laundry room: 
Lights without electricity
I used this little hack on that light too! You can find the black sconces here — they are affordable and you get two in the order. 
Usually when I build bookcases, I have electrical run to the lights to the header. This time, because I know of this lighting trick…I didn’t pay for that part. There are pros and cons to this trick so stay tuned for those! 

The trick is using these puck lights inside the fixtures: 
Trick for adding lights without electricity
I used this little hack in our dining area as well — it’s a way to add soft lighting without running electrical: 
Bookcase lights without electricity
It would have been really difficult to wire them on these skinny shelves, so this trick worked great! Make sure to check out the post to see how I made those specific sconces work! (Hint: it was even easier than what I’m sharing today.)
This time, I needed to secure them to the sconce because it was facing down. ** I’ve found an even easier and more secure way to do this so I’ll share that option first!
I discovered this little hack when working on our laundry and mud room makeover. When we had the cabinets moved, I later noticed that some task lighting would be nice on the new counter. I would have run electrical before I started this project, but I hadn’t planned on adding sconces. 
Enter these pretty sconces with the puck lights!: 
lighting black sconce above cabinets
This time though, the sconces had a shade that narrowed a bit too much at the top, so I knew the pucks would probably not fit. 
I noticed something when I was ordering the lights — as a suggested item at the bottom, it showed these handy outlet adapters: 
outlet adapters add outlet to light fixture
These are great if you don’t have outlets outside, especially for something like holiday lights. You can screw this into your outdoor lights and use them as an outlet instead. Cool, right? 
I decided to use them to make it easier to change out or charge the batteries in our non-electrical light fixtures. And I knew I needed to bridge the gap between where you screw in the bulb and where the shade gets too narrow on our sconces.  
I took some scrap dowel rod, cut it down and spray painted it to match the light. Then glued it on to the adapter: 
adapter hack for lighting without electricity
The spray painting is really not necessary — I thought we’d be able to see it in there but you can’t at all. You’ll need to figure out how long you want to cut your dowel, this will depend on your light fixture. 
I glued the parts together with Gorilla Glue, and it’s held up awesome! Once it’s cured it’s SUPER strong. I also used it to attach the bottom of the puck to my little contraption: 
easy way to screw puck lights into fixture
As you can see, I drilled a hole through the wood to run wire through (stay tuned for that in a minute), just for added security. It is not needed though, so if you choose this option you can forego the wire. 
This option makes it super easy to screw in and out, just like a light bulb!:
sconce with puck lights
It has worked so well — I’m planning on making this change to the sconces in my office. You can see how I first attached them with wire below…
If you don’t want to use glue or the adapters, all you’ll need is this 24 gauge wire:
How to use puck lights instead of bulbs
The sconces have a part inside that has a small hole. I ran the wire through that: 
Light a sconce without wiring electricity

The back of the puck light has two holes — you’ll need to run the wire through those, then tighten as much as you can:

Hack for lighting without electricity
When it’s secure, twist the puck light (with batteries) back on: 
Using puck lights instead of bulb in light fixtures
And that’s it! I use the bracket that comes with the light to hang — just screw it into the wall and hang your light: 
Library bookcase lights without electricity
They look GREAT! I wanted something simple that I could aim toward the shelves, and these work perfectly. 
As you can see here, I angled them so you can’t see the light unless you’re right under them. The scones have adjustable arms: 
Deep green vintage vogue bookcases using kitchen cabinets
Check out this post to see the steps of the DIY bookcases to this point!
I almost forgot to mention, that little remote in the photo above allows you to operate these without touching them. It has a timer and dimmer option which is great. The timer is key because when I’ve used puck lighting in the past, we would turn them on and ALWAYS forget to turn them off. The battery ran out quickly because of that. I purchased another puck light remote for this room. 
There are pros and cons to these little puck lights: 
Pros
  • Using this hack is MUCH cheaper than running electrical. 
  • You can use them anywhere so it opens up so many possibilities.
  • The puck lights give off a decent amount of light. 
  • You can do this with regular light fixtures (where the lights are enclosed) as well — not just sconces! 
Cons
  • The light is not as bright as normal bulbs. I’d compare it to somewhere between at 25-40 watt bulb.
  • The remote isn’t quite as convenient as a light switch.
  • The puck lights aren’t as attractive as a bulb. 

For me, the convenience far outweighs the cons. If I have an outlet below (to run wiring) and a good spot for a light switch nearby, I’ll still opt for having it wired. But this is a great option for bigger projects like this that would cost more to have an electrician add. 

The items I used for this lighting hack: 
Outlet adaptors
24 gauge wire
Gorilla glue
Set of puck lights
Extra remotes for lights
Short black and brass sconces
Long arm black and brass sconces (in laundry)
**The next step in this bookcase project (building the shelves) is here
**See this whole finished project here!

See more of our home here. 
To shop items in our home, click here! 
Never miss a post by signing up to get posts via email. 


Source link

How to use Rub 'n Buff for easy updates

How to use Rub ‘n Buff for easy updates


If you have a decor item that wants a minor a little something, this
“paint” that will come in a little tube is the fantastic answer for a swift
and quick update!

Rub ‘n Buff is this astounding metallic finish that is super straightforward to utilize (you just use
your finger or a soft fabric). The finish provides dimension and curiosity to essential decor like frames, mirrors and decorative objects. 

It really reveals off really depth on these goods as nicely — so if you have an intricate mirror or
frame, Rub ‘n Buff is fantastic for it. 

If you have by no means used it, you can be shocked at the energy in this little bitty
tube!:

This post may contain affiliate hyperlinks for
your convenience. 

It really is not definitely paint — extra of a wax. It goes on easily and then you can
lightly buff it out to soften the appear a bit. 

I’ve applied this stuff for decades, and it’s my go-to when you will find anything in
our home that is wanting a very little bland. 

How to utilize Rub ‘n Buff

It won’t search like much, but this things goes a loooong way. It really is uncomplicated to squeeze out way too significantly — you want to err on utilizing as well very little and you can constantly increase much more or
layer the end. 

You only have to use a small bit for accent jobs. I generally commence by dabbing my finger on the opening: 

gold rub n buff tube

I normally use my finger — I really feel like it can be simpler to do element operate that way. But you can also use a tender
cloth to utilize it: 

how to apply rub n buff
black frame with gold corner detail
From far absent it offers the appear of steel brackets. I loved that appear so substantially, I did the similar to some of the frames on our
relatives space Do it yourself image ledges. 

I used a number of items of painter’s tape to mark off the corners and then just
rubbed it on: 

applying rub n buff to frame

It dries virtually instantly, so you can buff it out ideal absent. 

Use possibly
your finger or a cloth to rub it in and even out the end: 

buffing out rub n buff

I like a finger for software and a fabric for the buffing portion. You never have to buff, but it does give it a pretty sheen and blends it nicely. 

You can use Rub ‘n Buff for larger sized tasks, but I have generally liked the minor
depth it adds in lesser doses: 

DIY wood ledges on white wall

I assume I’m likely to incorporate it to the sides of the frames as nicely, so we can
see the gold accent from all instructions. 

I like this mirror in our basement and that it matches the
partitions almost specifically: 

westchester gray DIY built ins

Occasionally you want contrast, often a far more muted search is what you happen to be
aiming for. I like how this blends in for a much more contemporary search, but it necessary
something

When I extra the box molding on the walls down there, I moved the
mirror to an additional wall and then added gold accents with the Rub ‘n Buff: 
add metallic highlight to boring mirror

The paint on the mirror experienced a marginally distressed look on the edges, so I employed those as my guide. 

It only took a number of minutes and manufactured a large change!: 

gold detail on gray mirror

On one thing like this particularly, you can find no perfection needed. Just swipe it on listed here and there right until you get the seem you want!

Exactly where you can use Rub ‘n Buff 

This things adheres to all types of surfaces — metallic and wood are effortless. I have not attempted it on plastic so allow me know if you have! It is an effortless way to alter up light-weight fixtures, frames, art, ornamental knobs…the options are limitless! 

I have grabbed these tubes a lot over the decades — it’s especially
beautiful when made use of to highlight quite texture. 

gold highlight on textured frame

You can use it as a substitute of spray paint for more compact pieces also. I “painted” some crimson metallic bells in our Christmas decor previous calendar year. The Rub ‘n Buff gave them a vintage glance with a lot more dimension than straight spray paint would give. 

If you have a substantial item, you can spray paint it and then increase some detail with the Rub ‘n Buff on best. It really is so flexible! 

DIY metal terrarium with Rub n Buff

The pewter Rub ‘n Buff gave it the look of metallic, with some variation that straight spray paint can not give. 

Suggestions for applying Rub ‘n Buff

  • Keep in mind, a small goes a extensive way — start with a tiny amount of money!
  • No have to have for brushes, you can use your finger or a cloth
  • It’s easily taken off from your fingers with nail polish remover
  • Play all over with shades! It comes in 9 various metallic finishes,
    from silver leaf to copper. 

I appreciate that it gives items an more mature, vintage glance for the reason that the complete
isn’t excellent, especially on textured surfaces.

It additional detail so our mirror is just not so blah anymore…just
more than enough to make it stand out!: 

westchester gray walls with box molding trim

Have you tried this magical wax end? It is entertaining and effortless! 


Source link